
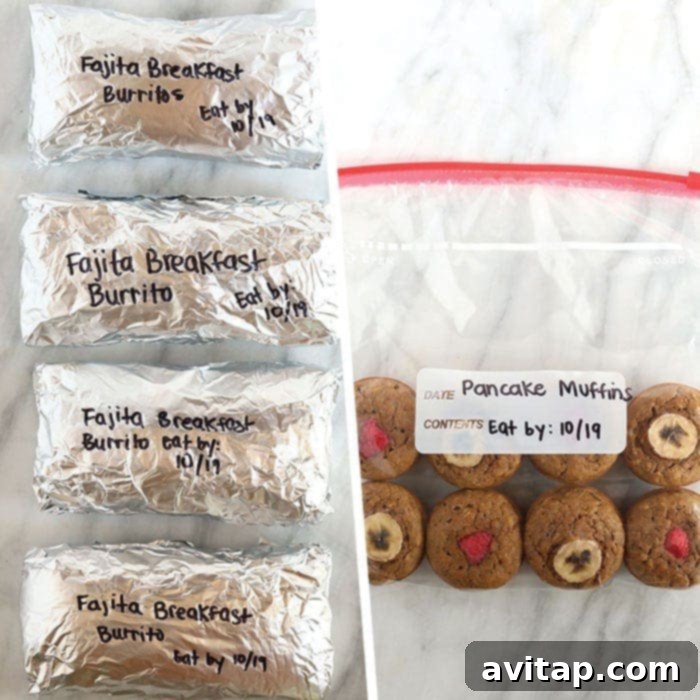
The Ultimate Guide to Make-Ahead Freezer Breakfasts for Effortless Mornings
Are you tired of rushed mornings and constantly skipping the most important meal of the day? Imagine a world where you wake up to a delicious, healthy breakfast that’s ready in minutes, without any last-minute cooking stress. Our comprehensive guide is here to transform your morning routine! We’ll show you exactly how to turn your favorite breakfast recipes into convenient, freezer-friendly meals, ensuring you always have a wholesome option at your fingertips. Get ready to embrace the simplicity of meal prepping and stock your freezer with incredible breakfast solutions that save you valuable time, energy, and money.
Why Embrace Make-Ahead Freezer Breakfasts?
The concept of meal prepping, especially for breakfast, is a true game-changer for busy individuals and families alike. There are countless compelling reasons why preparing your breakfasts in advance can significantly improve your daily life. It extends far beyond mere convenience; it’s about consistently making healthier choices, managing your precious time effectively, and dramatically reducing morning stress.
- Grab & Go Convenience: With a freezer full of pre-made breakfasts, you eliminate the frantic need for complicated cooking during the morning rush. Simply grab an item, thaw, and enjoy. This unparalleled convenience ensures you never have to skip breakfast again, even on your most hectic days.
- Nourishing and Healthy Choices: When you take the time to prepare your meals ahead, you gain complete control over every ingredient. This empowers you to prioritize whole grains, lean proteins, and fresh produce, making it effortless to stick to your healthy eating goals. Say goodbye to resorting to sugary cereals or unhealthy fast-food options when you’re short on time.
- Streamlined Meal Planning: Seamlessly integrating make-ahead breakfasts into your weekly meal plan simplifies your entire food preparation process. By dedicating just a small amount of time once a week, you can guarantee a consistent supply of nutritious breakfasts, freeing up mental space for other important tasks and reducing decision fatigue.
- Significant Time Savings: While the initial preparation requires some effort, the cumulative time saved over weeks and months is truly substantial. Batch cooking means you cook once but enjoy many meals, maximizing your efficiency in the kitchen and giving you back precious minutes each morning.
- Cost-Effective Eating: Preparing meals at home and buying ingredients in bulk is almost always more economical than purchasing individual ready-to-eat breakfasts or dining out. Make-ahead breakfasts help you manage your grocery budget more effectively and significantly reduce food waste.
- Reduced Morning Stress: The comforting knowledge that breakfast is already taken care of can dramatically lower your morning stress levels. Start your day calmly, enjoying a wholesome meal without the pressure of cooking or extensive cleanup.
Essential Make-Ahead Freezer Breakfast Tips
To ensure your make-ahead breakfast endeavors are a resounding success, consider these expert tips. They are designed to save you time, energy, and money, while effectively preventing freezer burn and ensuring delicious results with every single meal.
- Freeze Overripe Fruit: Never let valuable produce go to waste again! If you find bananas ripening too quickly, or berries approaching their expiration date, simply pop them into the freezer. Frozen fruits are incredibly versatile and perfect for blending into smoothies, incorporating into baked goods, or stirring into oatmeal. For optimal results, spread them in a single layer on a baking sheet before transferring to a freezer bag; this prevents them from clumping together. For more specific guidance, check out our detailed post on how to freeze bananas.
- Buy Bread in Bulk When on Sale: When you spot your favorite bread on sale at the grocery store, seize the opportunity and stock up! Purchasing a few extra loaves and freezing them can be an immense convenience. You can thaw individual slices as needed for toast, sandwiches, or French toast. This clever trick ensures you never run out of bread, even during the busiest weeks when a trip to the grocery store isn’t feasible.
- Seal Food Tightly to Prevent Freezer Burn: The arch-nemesis of all frozen food is freezer burn, a condition that occurs when food is exposed to air and dehydrates. To combat this, always ensure your food is sealed as tightly as possible, actively removing as much air as you can from the packaging. This critical step preserves the flavor, texture, and significantly extends the shelf life of your frozen breakfasts.
- Invest in Freezer Essentials: Having the right tools in your kitchen can make all the difference in your meal prepping success. Stock up on these freezer-friendly items to streamline your process:
- Freezer-Safe Gallon-Size Bags: These durable bags are ideal for storing individual servings or larger batches, providing excellent protection against freezer burn.
- Tin Foil: An excellent choice for wrapping individual items like burritos or French toast, offering an additional layer of protection.
- Stasher Bags: Environmentally friendly and reusable silicone bags that are incredibly durable and perfect for a wide variety of freezer needs.
- Sharpie: An indispensable tool for clearly labeling your food packages with their contents and the date they were frozen.
- Make a Double or Triple Batch: The most efficient approach to creating make-ahead meals is to cook in larger quantities. When you’re already preparing breakfast burritos, pancakes, or muffins, simply double or triple the recipe. The initial extra effort during one cooking session will yield multiple future meals, saving you substantial time and energy in the long run.
- Utilize What You Have On Hand: Be flexible and adaptable with your recipes. If a recipe calls for raspberries but you happen to have an abundance of blueberries in your fridge, don’t hesitate to substitute. Using ingredients you already possess not only prevents food waste but also makes meal prepping more economical and adaptable to your pantry.
- Always Label with an “Eat By” Date: This step is absolutely crucial for both food safety and preventing forgotten or expired items in your freezer. Clearly label each package with the specific food item and the date it was frozen. A good general guideline is to consume most frozen breakfasts within 3 months for optimal taste, texture, and quality.
- Ensure Complete Cooling Before Freezing: Before placing any cooked item into the freezer, it is imperative to allow it to cool completely to room temperature. Introducing warm food directly into the freezer can raise the internal temperature, potentially affecting other frozen items and leading to undesirable ice crystal formation on your freshly prepared food.
With these foundational tips in mind, you are now perfectly equipped to dive into our curated collection of 8 incredible healthy meal prep breakfast recipes. Each recipe includes simple, step-by-step instructions on how to prepare, freeze, and reheat, making your meal prepping journey both enjoyable and highly successful. Happy prepping!
Bagel Ham and Cheese Quiches: Savory Freezer Breakfasts
For those who truly prefer a savory and satisfying start to their day, these Freezer Bagel Quiches are an absolute culinary delight. They cleverly utilize your favorite bagels as their crust, creating a unique and deeply satisfying base for a delicious filling of savory ham, rich cheese, and perfectly fluffy eggs. These quiches are hearty, packed with flavor, and remarkably easy to prepare for freezing. Get the full recipe here and learn precisely how to make-ahead and freeze them below for a quick, gourmet-style breakfast any day of the week.
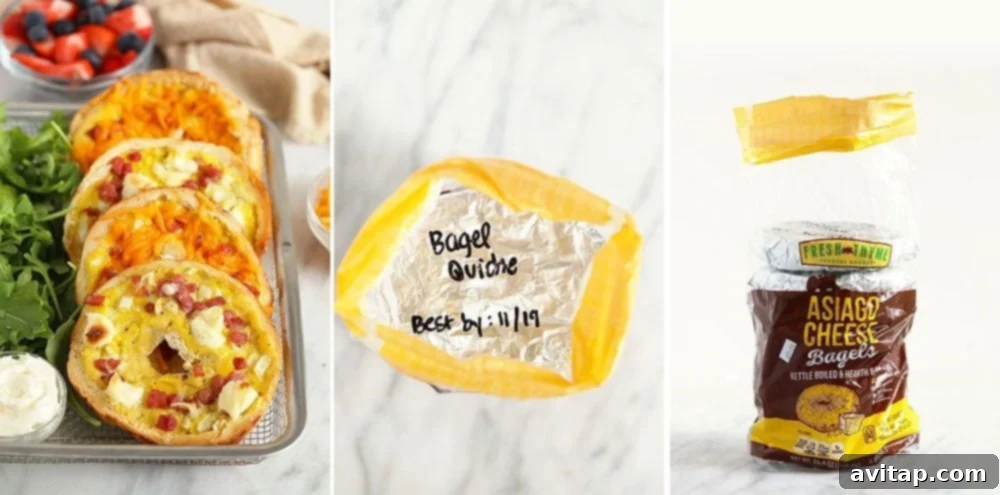
- Begin by preparing an entire batch of our delectable Bagel Ham and Cheese Quiches according to the detailed recipe instructions. You will need six bagels in total. A helpful tip: remember to save the original plastic bagel sleeve; it will prove useful for organized freezing!
- Allow each of the baked bagel quiches to cool down completely to room temperature on a wire rack. This is a critical step to prevent undesirable ice crystals from forming during the freezing process.
- Once thoroughly cooled, tightly wrap each individual bagel quiche half in a piece of tin foil. Press out as much air as possible from around the quiche to effectively prevent freezer burn and maintain freshness.
- Using a permanent marker, clearly label each wrapped bagel quiche with “Ham and Cheese Bagel Quiche” and the “Eat By” date, which should ideally be approximately 3 months from the date of preparation for optimal quality.
- Carefully place the individually wrapped bagel quiches back into the original bagel sleeve or a larger freezer-safe bag. Remove any excess air from the bag and seal it securely with a rubber band or twist tie.
- Freeze for up to 3 months.
- Thawing and Reheating: To enjoy your frozen quiche, simply remove a bagel quiche from the freezer and unwrap it completely from the tin foil.
- Place the unwrapped quiche directly into a toaster oven or a standard toaster (if it fits) and toast on a medium-high setting for a few minutes until it is heated through and the crust is delightfully crispy. Alternatively, you can defrost it in the microwave for a few minutes until it is warm and ready to eat.
Peanut Butter Chocolate Chip Oatmeal Cups: Sweet & Wholesome Grab-and-Go
Packed with nourishing whole grains, essential fiber, and an utterly irresistible flavor profile, baked oatmeal cups are an absolutely fantastic option for a healthy, satisfying, and convenient breakfast. Our Peanut Butter Chocolate Chip Baked Oatmeal Cups are a beloved fan-favorite, delivering a delightful blend of comforting sweetness and robust nutrition in every bite. These perfectly portioned cups truly deserve a permanent spot in your freezer for convenient, guilt-free indulgence year-round. Get the full recipe here and discover just how simple it is to make and freeze them for later, ensuring a wholesome treat is always within reach.
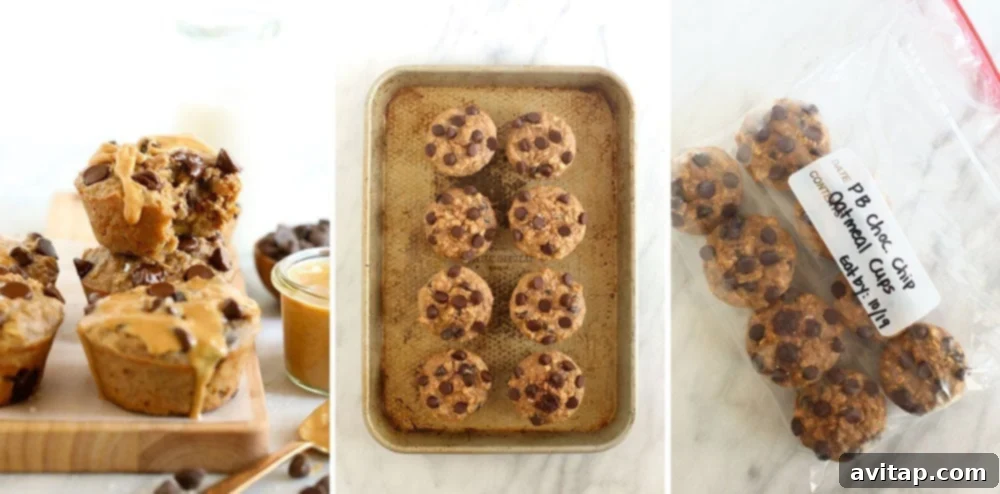
- First, prepare a fresh batch of our delightful Peanut Butter Chocolate Chip Baked Oatmeal Cups following the detailed recipe instructions. Once baked, allow them to cool completely on a wire rack.
- Arrange the thoroughly cooled oatmeal cups in a single layer on a baking sheet. Then, place the baking sheet in the freezer for approximately 30 minutes to 1 hour, allowing the cups to “flash freeze” until they become firm. This crucial step prevents them from sticking together when transferred to a storage bag.
- Prepare a freezer-safe gallon-size bag by clearly writing “Peanut Butter Chocolate Chip Oatmeal Cups” and the “Eat By” date (approximately 3 months from the preparation date) prominently on the bag.
- Once the oatmeal cups are fully frozen and firm, carefully transfer them from the baking sheet into the labeled freezer bag. Ensure you remove as much air as possible from the bag before sealing it tightly.
- Store in the freezer for up to 3 months.
- Thawing and Reheating: To reheat, simply place 2 frozen oatmeal cups on a microwave-safe plate. Defrost them in the microwave for a few minutes until they are thoroughly warm and ready to savor.
Sheet Pan French Toast: The Ultimate Freezer Batch
Have you ever yearned for a magical way to enjoy homemade French toast without the usual morning fuss and extensive cooking? Your culinary dreams are now a delightful reality with our incredibly simple guide on how to make and freeze Sheet Pan French Toast. This brilliant method is absolutely perfect for meal prepping, allowing you to effortlessly transform an entire loaf of bread into a freezer-ready breakfast staple. Get the full recipe here and learn the precise steps to make-ahead and freeze it efficiently for convenient, delicious breakfasts anytime you desire.
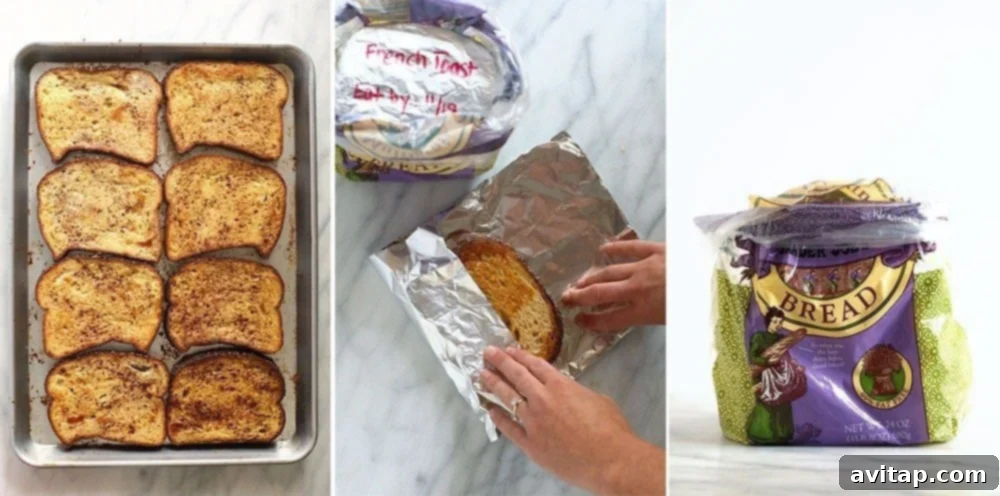
- Start by doubling our Sheet Pan French Toast recipe, or simply prepare French toast using an entire sleeve of bread to maximize your batch. A helpful tip: be sure to keep the plastic bag the bread originally came in; it will be incredibly useful for organized storage later.
- Allow all the cooked French toast pieces to cool completely to room temperature on a wire rack before proceeding to the next steps.
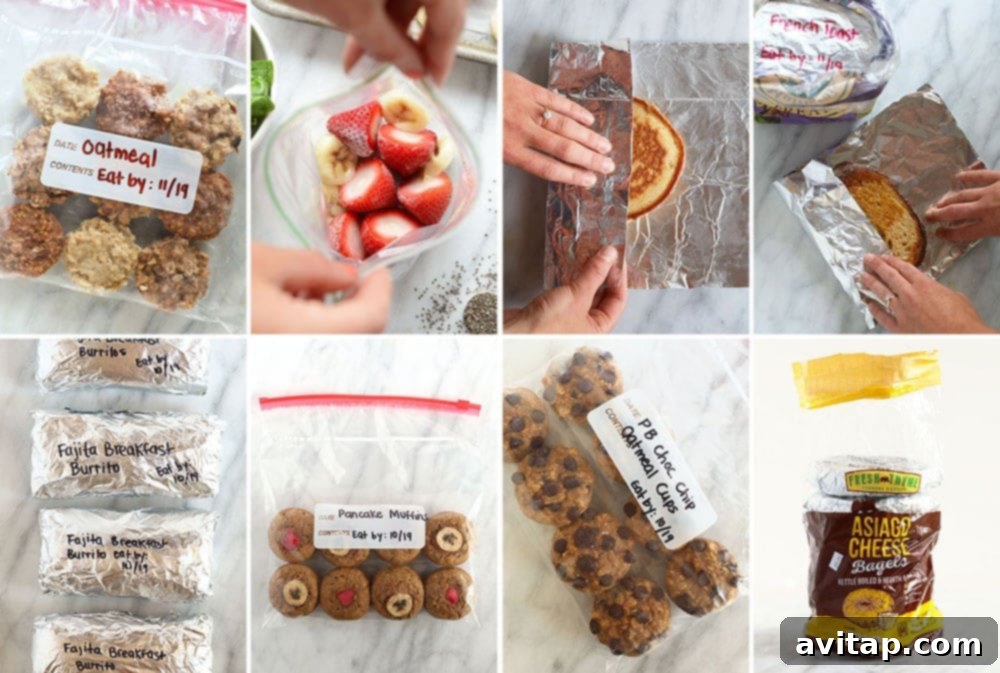
- Once thoroughly cooled, carefully wrap two pieces of French toast together in a single sheet of tin foil. This pairing ideally represents one serving according to the recipe. Press out as much air as possible from around the French toast before securely sealing the foil. Repeat this precise process for all remaining French toast pieces.
- On each foil-wrapped serving, clearly write “French Toast” along with the “Eat By” date, typically 3 months from when it was initially prepared.
- Place the individually wrapped French toast pairs back into the original bread bag or a large freezer-safe bag. Remove any excess air from the bag and seal it tightly with a rubber band or twist tie.
- Freeze for up to 3 months.
- Thawing and Reheating: To thaw, simply remove a serving of French toast from the freezer and unwrap it from the tin foil.
- Let the unwrapped French toast sit at room temperature for a few minutes to allow the two pieces to separate easily.
- Place the French toast directly into a toaster or toaster oven and toast for a few minutes until it is beautifully golden brown and heated through. Alternatively, you can gently defrost and warm it in the microwave for a minute or two.
Banana Pancake Muffins: A Delightful Fusion for Busy Mornings
Why force yourself to choose between fluffy, comforting pancakes and convenient, grab-and-go muffins when you can effortlessly have both? Our Healthy Banana Pancake Muffins offer the absolute best of both worlds – the delicious, sweet flavor of pancakes masterfully baked into a portable muffin format, all while being packed with wholesome grains. These are an ideal make-ahead breakfast option, perfect for freezing and pulling out whenever you need a quick, nutritious, and incredibly satisfying start to your day. Get the full recipe here and learn the simple, straightforward steps to prepare and freeze them for ultimate convenience.
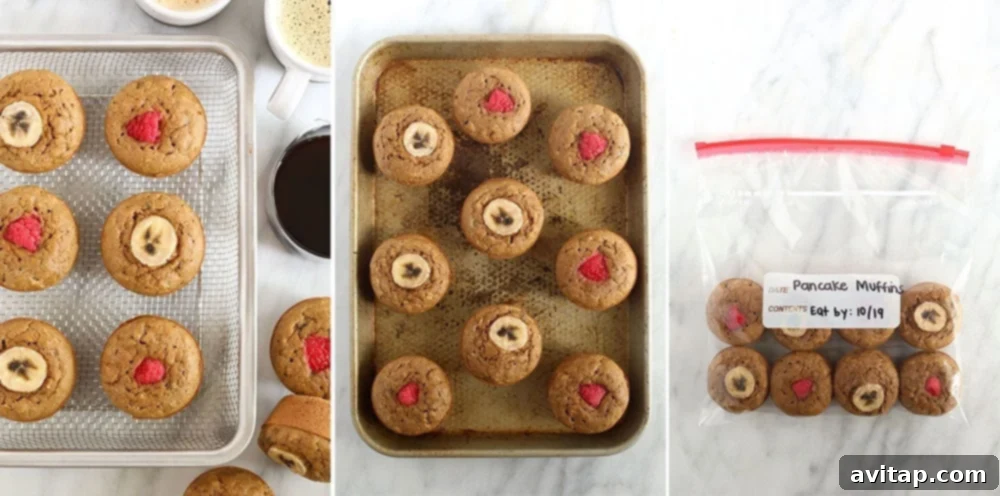
- First, prepare a fresh batch of our delightful Banana Pancake Muffins according to the detailed recipe instructions. After baking, ensure the pancake muffins cool completely on a wire rack.
- Arrange the thoroughly cooled muffins on a baking sheet in a single layer. Place the baking sheet into the freezer for approximately 30 minutes to 1 hour. This crucial flash-freezing step prevents the muffins from sticking together when they are transferred to a storage bag.
- Prepare a freezer-safe gallon-size bag by clearly writing “Banana Pancake Muffins” along with the “Eat By” date (approximately 3 months from the preparation date) prominently on it.
- Then, once the muffins are frozen solid, carefully transfer them from the baking sheet into the labeled freezer bag. Press out as much air as possible from the bag before sealing it tightly.
- Freeze for up to 3 months.
- Thawing and Reheating: To reheat, simply remove the desired number of muffins from the freezer bag and place them on a microwave-safe plate. Defrost them in the microwave for a few minutes until they are thoroughly warm and soft, ready to be enjoyed.
Steel Cut Oatmeal: Portion-Controlled Freezing for Busy Weeks
Steel-cut oatmeal is highly renowned for its hearty, chewy texture, rich flavor, and its numerous impressive health benefits. However, its typically longer cooking time can often be a significant deterrent on busy mornings. The excellent news is that you can easily prepare a large batch of steel-cut oatmeal (or any type of oatmeal you prefer) and freeze it in convenient individual portions using a muffin tin! This ingenious method ensures you have a healthy, warm, and satisfying breakfast ready in mere minutes any day of the week. Learn how to master making oatmeal in various ways here, and then follow our simple steps below to efficiently make-ahead and freeze it.
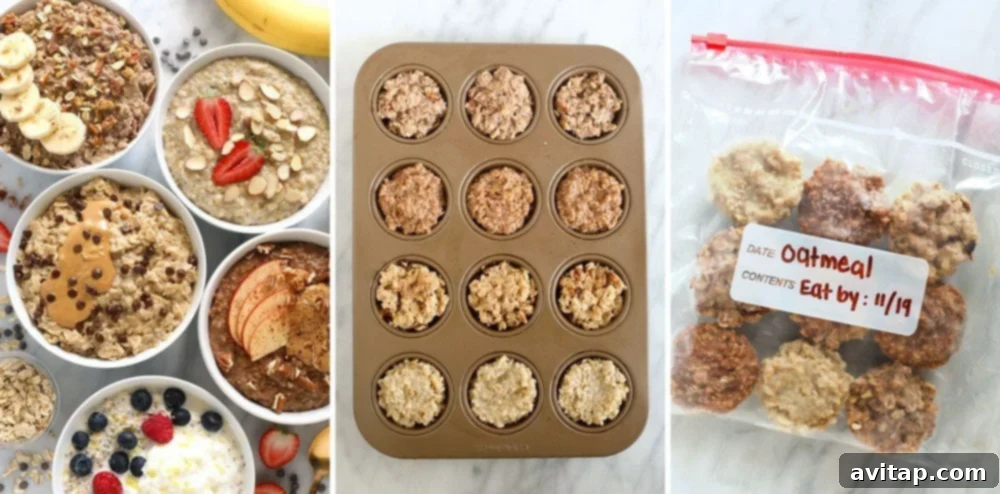
- First, prepare a generous batch of your favorite oatmeal. You can discover our top basic oatmeal recipes here, which include steel-cut, rolled, and instant varieties.
- Allow the cooked oatmeal to cool completely to room temperature before proceeding.
- Generously spray a standard muffin tin with nonstick cooking spray to ensure easy and clean removal of the frozen oatmeal portions.
- Carefully spoon the cooled oatmeal into each muffin cup, filling them completely to the top to create substantial and satisfying portions.
- Place the filled muffin tin in the freezer and freeze for at least 2 hours, or ideally overnight, until the oatmeal is completely solid and firm.
- Once thoroughly frozen, remove the muffin tin from the freezer. Let it sit on the countertop for approximately 10 minutes to allow the edges to slightly thaw, which will make removal considerably easier. Alternatively, you can run hot water over the bottom of the muffin tin for a few seconds to gently loosen the oatmeal cups.
- Carefully remove each oatmeal cup from the muffin tin (a butter knife can be helpful to gently pry them out). Transfer the individual frozen oatmeal cups into a freezer-safe gallon-size bag.
- Remove as much air as possible from the bag before sealing it tightly to prevent freezer burn.
- Clearly label the bag with “Oatmeal” along with the “Eat By” date (approximately 3 months from the time it was prepared).
- Freeze for up to 3 months.
- Thawing and Reheating: To reheat, remove 2-3 frozen oatmeal cups from the freezer bag and place them into a microwave-safe bowl.
- Defrost in the microwave for 2-3 minutes. Then, microwave on high for an additional 30-60 seconds, stirring occasionally, until it is heated through and becomes wonderfully creamy. Add a splash of milk or water if desired to achieve a thinner consistency.
Fajita Breakfast Burritos: Hearty and Satisfying Anytime
There’s truly nothing quite like a hearty, flavorful, and incredibly satisfying breakfast burrito to kickstart your day, especially when it’s packed with vibrant, zesty fajita flavors. Our popular Fajita Breakfast Burritos recipe is specifically designed to yield eight generous burritos, making it an outstanding candidate for efficient batch cooking and freezing. Prepare these delicious burritos once, and you’ll be able to enjoy them for weeks to come, simplifying your mornings significantly and adding excitement to your breakfast routine. Get the full recipe here and learn the detailed, step-by-step instructions on how to make-ahead and freeze them for ultimate convenience.
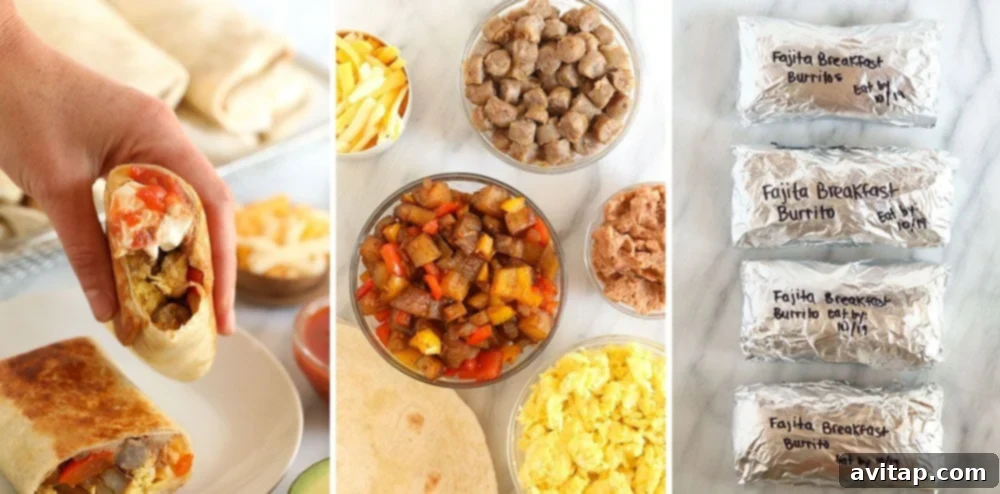
- First, prepare a batch of our delicious Fajita Breakfast Burritos according to the detailed recipe instructions. Once assembled and rolled, allow them to cool completely to room temperature.
- Tightly wrap each individual burrito in a piece of plastic wrap, ensuring as much air as possible is pressed out to effectively prevent freezer burn. Then, wrap each plastic-wrapped burrito again in an additional layer of tin foil for double protection and enhanced insulation.
- On the outer tin foil layer of each burrito, clearly write “Fajita Breakfast Burrito” and the “Eat By” date (approximately 3 months from the date of preparation) using a permanent marker.
- Transfer the double-wrapped burritos into a large freezer-safe gallon-size bag. Remove any remaining air from the bag before sealing it tightly.
- Freeze for up to 3 months.
- Thawing and Reheating: To reheat, remove one frozen burrito from the freezer. Make sure to unwrap both the tin foil and the plastic wrap completely. Place the unwrapped burrito on a microwave-safe plate and defrost in the microwave until it is thoroughly heated through, which usually takes a few minutes. For a deliciously crispier exterior, you can optionally finish it in a hot skillet or oven after microwaving.
Healthy Pancakes: Freeze for Instant Indulgence
Do you absolutely adore the comforting taste and fluffy texture of homemade pancakes but dread the time and effort required to make them from scratch every single morning? Our brilliant solution is wonderfully simple: prepare a double or even a triple batch of your favorite healthy pancake recipes and then freeze them in convenient single servings for later! This ingenious strategy ensures you can enjoy warm, fluffy, homemade pancakes anytime you desire with minimal effort and maximum satisfaction. Explore six of our most beloved healthy pancake recipes here, and then follow the clear instructions below to make-ahead and freeze them perfectly for future enjoyment.
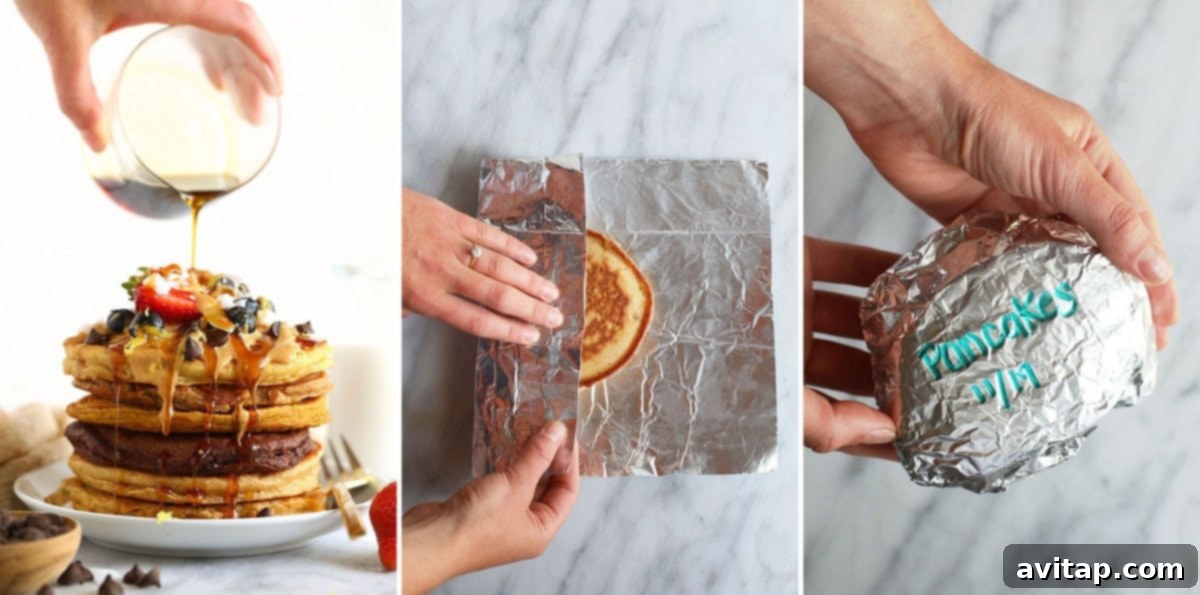
- First, prepare a generous batch (or an even larger double batch!) of one of our delicious healthy pancake recipes according to the detailed instructions.
- Allow all the cooked pancakes to cool completely to room temperature on a wire rack before moving on to the next step.
- Once thoroughly cooled, gently stack two pancakes together, then tightly wrap the pair with a piece of tin foil. Press out as much air as possible from around the pancakes to effectively prevent freezer burn and maintain their texture.
- On the tin foil wrapper, clearly write “Pancakes” along with the “Eat By” date (approximately 3 months from when they were initially made).
- Repeat this precise wrapping and labeling process until all your prepared pancakes are neatly and securely packaged.
- Freeze for up to 3 months.
- Thawing and Reheating: To thaw and reheat, simply remove a pair of foil-wrapped pancakes from the freezer.
- Unwrap the tin foil and let the pancakes sit at room temperature for a few minutes. This allows them to slightly soften and separate easily.
- Place the pancakes directly into a toaster, toaster oven, or on a griddle and toast for a few minutes until they are warmed through and delightfully crispy. Alternatively, you can defrost and reheat them gently in the microwave.
Strawberry Banana Spinach Smoothies: Prep-in-a-Bag Perfection
While smoothies are already a wonderfully quick and convenient breakfast option, you can streamline the process even further with our ingenious “smoothie in a bag” method. By meticulously prepping all of your Strawberry Banana Spinach Smoothie ingredients in advance and storing them in individual freezer bags, all you’ll need to do on busy mornings is add your favorite milk and blend! This ensures a nutrient-packed, incredibly delicious smoothie with absolute minimal fuss. Get the full recipe here and learn precisely how to make-ahead and freeze your smoothie ingredients below for ultimate grab-and-go convenience.
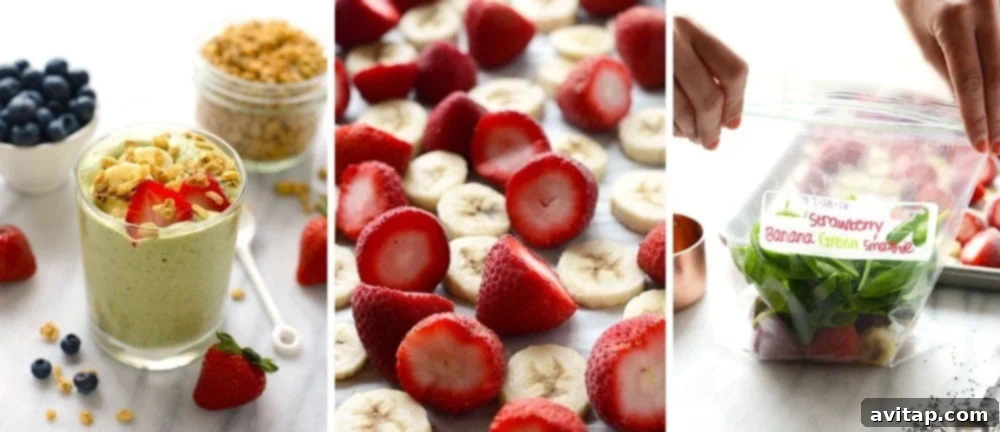
- Follow the specific “for the bag instructions” provided in this post to meticulously assemble all the ingredients for our Strawberry Banana Spinach Smoothie into individual freezer bags.
- Once each bag is carefully filled with the exact smoothie components, clearly write “Strawberry Banana Green Smoothie” and the “Eat By” date (approximately 3 months from the assembly date) prominently on each bag using a permanent marker.
- Remove as much air as possible from each bag before sealing it tightly. For optimal freezer organization and even freezing, lay the bags flat in the freezer.
- Freeze for up to 3 months.
- To Make Your Smoothie: Simply remove one prepped smoothie bag from the freezer and empty its frozen contents directly into a high-speed blender.
- Add approximately 1/2 cup to 1 cup of your preferred unsweetened almond milk (or any other milk of choice), along with 2 tablespoons of your favorite protein powder if desired, to the blender.
- Blend on high for about 1 minute, or until the smoothie reaches your desired smooth and beautifully creamy consistency. Enjoy immediately for a quick and refreshing breakfast!
Discover More Make-Ahead Breakfast Inspirations
Are you looking for even more innovative ways to simplify your mornings and ensure a consistently delicious, healthy start to your day? Our extensive collection of recipes extends far beyond these featured favorites! We encourage you to explore additional recipes that are perfectly suited for make-ahead preparation and freezing, offering an even greater variety and flexibility for your breakfast routine. These recipes have been carefully tried and tested to hold up beautifully in the freezer, ensuring they are always ready and waiting for when you need them most.
- Oatmeal Chocolate Chip Pancakes
- Healthy Blueberry Waffles
- Healthy Chocolate Muffins
- Protein Waffles
- Make Ahead Breakfast Burritos
- Pumpkin Pie Slow Cooker Steel Cut Oatmeal
- Coconut Flour Pancakes
- Egg in a Frame
- Protein-Packed Breakfast Burritos
Embrace the transformative power of make-ahead meals and effortlessly switch your mornings from chaotic to gloriously calm. With these delicious and incredibly easy-to-freeze breakfast options, you’ll always have a nutritious, satisfying meal ready to go, empowering you to start each and every day feeling thoroughly prepared, energized, and ready to conquer anything!