

Looking for a quick, yet incredibly effective workout to torch fat and build strength? This full-body superset Tabata routine is your answer! Get ready to sweat, challenge your limits, and ignite your metabolism in record time. Whether you’re short on time or simply want to maximize your results, this high-intensity workout is designed to deliver.
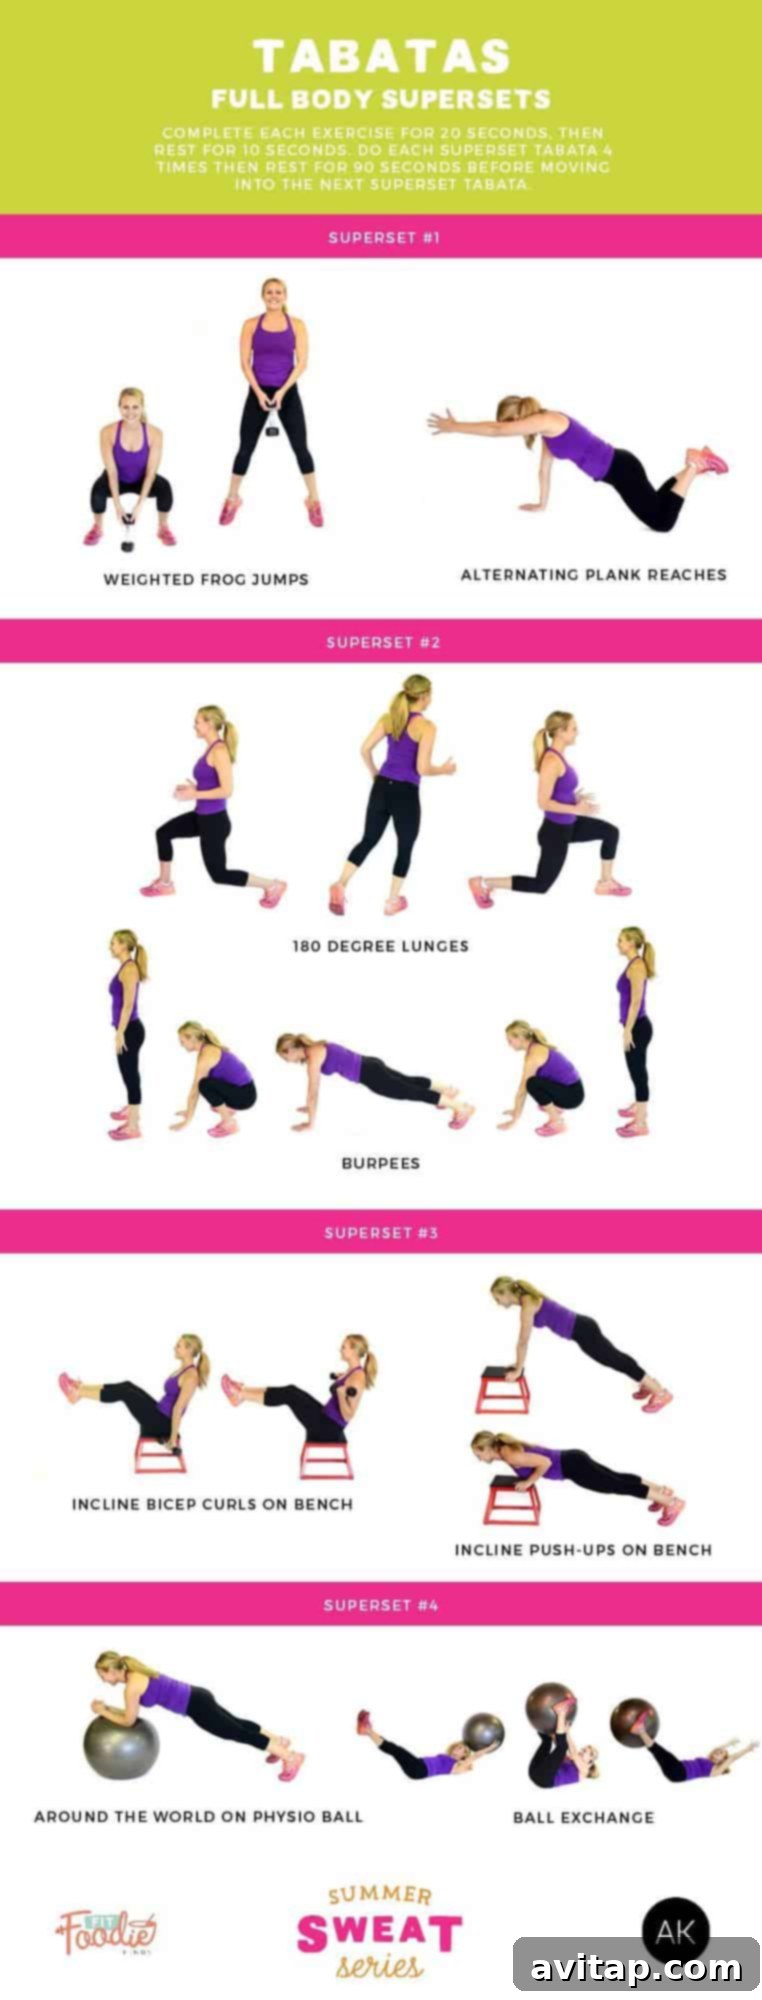
Ignite Your Metabolism: The Ultimate Full Body Superset Tabata for Rapid Fat Burning
In today’s fast-paced world, finding time for a comprehensive workout can be challenging. That’s why high-intensity interval training (HIIT) methods like Tabata and supersets have become incredibly popular. They offer a potent combination of cardio and strength, delivering remarkable results in minimal time. This particular routine focuses on a full-body approach, ensuring every major muscle group is engaged, leading to accelerated fat burning and improved overall fitness.
Prepare to push your boundaries with this expertly crafted workout that blends challenging exercises with a dynamic Tabata format. It’s not just about moving; it’s about moving with purpose and intensity to achieve your fitness goals efficiently. This routine is perfect for anyone looking to maximize their workout in a short amount of time, whether you’re at home or in the gym.
Understanding Tabata and Supersets: Your Keys to Maximum Efficiency
To truly appreciate the power of this workout, let’s break down the core principles behind it, and why they are so effective for fat burning and muscle development:
What is Tabata Training?
Tabata is a specific type of high-intensity interval training (HIIT) that follows a strict 20-second work, 10-second rest protocol, repeated for 8 rounds, totaling 4 minutes per exercise or superset. This precise structure is designed to push your anaerobic and aerobic systems to their absolute limits, leading to significant calorie expenditure during and, crucially, *after* your workout. This “afterburn effect,” scientifically known as EPOC (Excess Post-exercise Oxygen Consumption), means your body continues to burn calories at an elevated rate for hours following your session. This makes Tabata incredibly efficient for fat loss.
The Power of Supersets
Supersets involve performing two exercises back-to-back with little to no rest in between. In this full-body Tabata workout, we strategically pair two complementary exercises for each 4-minute Tabata interval. This method dramatically increases the intensity and density of your workout, keeping your heart rate elevated, maximizing muscle fatigue, and significantly cutting down on total workout time. By challenging your muscles in different ways consecutively, supersets promote both strength and endurance gains while enhancing cardiovascular fitness.
By combining these two powerful training methodologies, you create a metabolic powerhouse that’s incredibly effective for burning stubborn fat, building lean muscle mass, and boosting your cardiovascular health. Get ready to experience a challenging yet rewarding workout that delivers unparalleled results.
Workout Overview and Setup
This routine is structured to be intense and incredibly efficient. Adhere closely to the prescribed timing to reap the full benefits of the Tabata protocol and superset structure. Consistency in timing is key to unlocking the metabolic advantages of this workout.
Equipment Needed: You will need a set of medium-size dumbbells, a sturdy bench (or a stable chair/box), and a physio ball (also commonly known as a stability ball). Ensure all equipment is stable, in good condition, and safe for use before you begin.
Workout Description:
- For each superset, you will perform the first exercise for 20 seconds, immediately followed by 10 seconds of active rest.
- Then, you will perform the second exercise for 20 seconds, immediately followed by 10 seconds of active rest.
- This completes one full round of the superset Tabata (40 seconds work, 20 seconds rest total).
- Repeat this entire sequence (Exercise 1 + rest, Exercise 2 + rest) 4 times for a total of 4 minutes per superset.
- After completing all 4 rounds of a superset, take a well-deserved 90-second rest period before moving on to the next superset Tabata. This allows for partial recovery before the next intense burst.
Remember: Quality of movement always triumphs over quantity or speed. Focus intensely on proper form throughout each exercise to prevent injury and maximize muscle engagement and fat-burning potential. If your form falters, reduce the intensity or take a brief pause.
Before You Begin: The Importance of a Dynamic Warm-Up
Never skip your warm-up! A proper warm-up is crucial for preparing your body for the strenuous activity ahead. It increases blood flow to your muscles, improves flexibility and range of motion, and mentally prepares you for the workout. Aim for 5-10 minutes of dynamic stretches and light cardio to get your heart rate gently elevated. Consider movements like:
- Light Jumping Jacks (start slow, gradually increase pace)
- Arm Circles (both forward and backward, gradually increasing circle size)
- Leg Swings (forward, backward, and side-to-side, controlling the movement)
- Torso Twists (gentle rotation, engaging your core)
- Cat-Cow Stretches (improving spinal mobility)
- Bodyweight Squats (practicing fundamental movement patterns)
- Walking Lunges (dynamic hip and leg preparation)
These movements will gently elevate your heart rate and loosen up your joints and muscles, significantly reducing the risk of injury and enhancing your performance during the Tabata intervals.
The Ultimate Full Body Superset Tabata Workout for Fat Burning
Superset #1: Explosive Power & Core Stability Foundation
This superset kicks off your workout with a powerful blend of lower-body explosiveness and essential core stability. It’s designed to rapidly elevate your heart rate and engage your entire core from the very start, setting the tone for the rest of your session.
1. Weighted Frog Jumps
- Starting Position: Stand with your feet slightly wider than hip-width apart, toes pointed slightly out (approximately 45 degrees), and heels angled inward. Hold a medium-sized dumbbell vertically between your legs, letting it hang naturally and securely.
- Movement: Lower into a deep frog squat, ensuring your chest remains lifted, your back is straight, and your core is tightly engaged. Focus on keeping your weight predominantly in your heels, and make sure your knees track directly in line with your toes. From the bottom of this deep squat, powerfully explode upwards, jumping into the air with as much force as possible.
- Landing: Land softly back into the frog squat position, absorbing the impact through your legs. Control the descent to protect your joints and maintain stability. Immediately flow into the next jump.
- Key Form Cues: Maintain a neutral spine throughout the movement. Focus on generating power primarily from your glutes and quadriceps. Keep the dumbbell secure between your hands or legs.
- Muscles Worked: Primarily glutes, quadriceps, hamstrings, and calves. Also engages the core for stability.
- Modification: If weighted jumps are too intense or impact is an issue, perform bodyweight frog jumps. To further modify, execute bodyweight frog squats without the jump, focusing on the deep range of motion.
- Benefits: Excellent for developing explosive power, strengthening major lower-body muscle groups, and rapidly elevating your heart rate for significant calorie burn.
2. Alternating Plank Reaches
- Starting Position: Begin in a strong high plank position. Your hands should be directly under your shoulders, fingers spread wide for optimal stability. Your body must form a straight, rigid line from the crown of your head to your heels. Engage your core tightly, squeezing your glutes.
- Movement: Slowly and with extreme control, lift one arm off the ground and reach it forward, extending it directly in front of you. Crucially, focus on keeping your hips absolutely parallel to the ground, minimizing any rocking, twisting, or sagging. Return the arm to the starting position with equal control. Alternate sides, reaching forward with the other arm.
- Key Form Cues: Avoid letting your hips sag towards the floor or pike up towards the ceiling. Maintain a strong, stable core throughout the entire movement. The slower and more controlled your reaches, the more effective this exercise becomes for building deep core stability.
- Muscles Worked: Primarily transverse abdominis, obliques, rectus abdominis, and serratus anterior. Also engages shoulders and back for stability.
- Modification: Perform the plank on your knees to reduce intensity, while still intensely focusing on maintaining a stable core during the reaches. If reaching is too difficult, hold a static high plank.
- Benefits: Builds exceptional core stability and anti-rotational strength, improves shoulder stability, and enhances full-body tension—skills crucial for preventing injury and improving performance in all other exercises.
Superset #2: Dynamic Lower Body & Full-Body Metabolic Blast
This superset continues to challenge your lower body with dynamic, multi-directional lunges and then throws in a powerful full-body cardio and strength builder with burpees, guaranteeing a significant metabolic boost.
1. 180 Degree Lunges
- Starting Position: Stand tall with your feet hip-width apart, core engaged, and shoulders relaxed. Maintain a neutral gaze forward.
- Movement: From your central standing position, pivot 90 degrees to your left. As you turn, step forward with your left leg and descend into a lunge. Aim for both knees to be bent at approximately 90 degrees, ensuring your front knee is directly over your ankle and your back knee hovers just above the floor. Push powerfully off your left foot to return to the center standing position. Immediately pivot 90 degrees to your right, stepping forward with your right leg into a lunge. Continue alternating sides fluidly, maintaining control and balance.
- Key Form Cues: Keep your torso upright and core engaged for balance throughout the rotation and lunge. Ensure your front knee does not collapse inward. Control the rotation, don’t let momentum take over.
- Muscles Worked: Quadriceps, glutes, hamstrings, and calves. Also engages core for balance and stability.
- Modification: Perform alternating forward lunges without the 180-degree turn if balance or rotation is a challenge. Focus solely on achieving proper lunge form.
- Benefits: Enhances balance, coordination, and strengthens the glutes, quadriceps, and hamstrings from different angles, promoting comprehensive lower body development and improved agility.
2. Burpees
- Starting Position: Stand with your feet hip-width distance apart, ready for explosive, dynamic movement. Your body should be poised and ready.
- Movement: Begin by bending down and planting your hands firmly on the ground directly in front of your feet, roughly shoulder-width apart. Swiftly jump your feet back into a high plank position, ensuring your body forms a straight line. From the plank, immediately jump your feet forward, landing softly in a deep squat position with your hands still on the ground. Finally, explode upwards from the squat, driving through your heels and reaching your arms overhead. An optional jump at the top adds further intensity.
- Key Form Cues: Maintain a straight back and engaged core when in the plank position. Land softly and quietly when jumping your feet forward. Use your core to stabilize throughout the entire rapid sequence of movements.
- Muscles Worked: A true full-body exercise engaging chest, shoulders, triceps, quadriceps, glutes, hamstrings, and core, while also being highly cardiovascular.
- Modification: Step back into the plank one foot at a time instead of jumping. You can also skip the jump at the top and simply stand up. For a further modification, walk your feet back and forward, and rise to standing without any jump.
- Benefits: A phenomenal full-body exercise that targets every major muscle group, significantly boosts cardiovascular endurance, and burns a high number of calories due to its compound nature and high intensity.
Superset #3: Upper Body Sculpt & Core Engagement on the Bench
This superset masterfully focuses on sculpting your upper body, particularly your biceps and chest, while simultaneously keeping your core actively engaged. Utilizing the bench for incline variations adds a unique challenge to traditional movements.
1. Incline Bicep Curls on Bench
- Starting Position: Sit on the edge of a sturdy bench (or on the floor with a slight recline), holding a medium-sized dumbbell in each hand. Lean back slightly, actively engaging your core muscles, and extend your legs straight out in front of you, forming a ‘V’ shape with your body. This challenging “boat pose” engagement intensifies the core work significantly.
- Movement: Keeping your elbows tucked tightly close to your sides and stationary, exhale as you curl the dumbbells upwards towards your shoulders, focusing on squeezing your biceps intensely at the top of the movement. Inhale as you slowly and with control lower the dumbbells back down to the starting position, fully extending your arms. Avoid letting the weights drop.
- Key Form Cues: Avoid swinging the weights; rely purely on bicep strength. Keep your core tight and engaged to maintain your leaned-back position and protect your lower back. Focus on a controlled curl and a slow eccentric (lowering) phase for maximum muscle activation.
- Muscles Worked: Primarily biceps brachii. Secondary muscles include forearms and core stabilizers.
- Modification: If maintaining the “boat pose” is too challenging for your core, sit upright on the bench or perform standing bicep curls, always focusing on strict form to isolate the biceps.
- Benefits: Isolates and strengthens the biceps for enhanced arm definition, while the incline and boat pose variation also significantly challenge core stability and endurance, making it a dual-purpose exercise.
2. Incline Push-Ups on Bench
- Starting Position: Place your hands shoulder-width apart on the edge of the bench, ensuring your fingers are pointing forward. Step your feet back until your body forms a perfectly straight line from head to heels, creating a high plank position. Engage your core and squeeze your glutes tightly to maintain this rigid body line.
- Movement: Inhale as you slowly lower your chest towards the bench, leading with your chest and keeping your elbows pointing slightly back, not flaring out excessively to the sides. Maintain a flat back throughout the entire descent. Exhale as you powerfully push back up to the starting high plank position, fully extending your arms.
- Key Form Cues: Keep your core tight to prevent your hips from sagging towards the floor. Control both the descent and ascent phases of the movement. Maintain a neutral neck alignment, looking slightly ahead of your hands.
- Muscles Worked: Primarily pectoralis major (chest), deltoids (shoulders), and triceps. Also engages the core as a stabilizer.
- Modification: If the bench incline is still too challenging, use an even higher surface (e.g., a sturdy table or a wall) to reduce the resistance further. For a progression, perform regular push-ups on the floor (on your toes or knees) to increase difficulty.
- Benefits: Strengthens the chest, shoulders, and triceps. The incline makes it more accessible while still promoting proper push-up mechanics, building foundational upper body strength crucial for more advanced movements.
Superset #4: Dynamic Core Challenge & Stability with Physio Ball
The final superset is dedicated to intensely targeting your core from multiple angles, incorporating the physio ball for an added layer of instability. This forces deeper muscle activation and significantly enhances overall core strength and control.
1. Around the World on Physio Ball
- Starting Position: Begin in a forearm plank position with your forearms resting squarely on top of the physio ball. Your body should be in a straight, rigid line from head to heels. Your core must be tightly engaged, and glutes squeezed to prevent any sagging.
- Movement: Keeping your core extremely tight and your hips as stable and motionless as possible, slowly and deliberately move the physio ball in a circular motion underneath your forearms. Imagine you are drawing a circle on the floor with the ball. Reverse the direction of the circle halfway through your 20-second interval or alternate directions on subsequent rounds.
- Key Form Cues: The ultimate goal is to move the ball without allowing your torso or hips to sway, arch, or twist. This requires intense anti-rotation and anti-extension core strength. Control is absolutely paramount; prioritize stability over the size of the circle.
- Muscles Worked: Primarily transverse abdominis, obliques, rectus abdominis, serratus anterior, and deep spinal stabilizers. Also engages shoulders and lats.
- Modification: If using the physio ball is too unstable initially, perform a regular forearm plank on the floor, holding for the duration of the interval. Alternatively, reduce the size of the circles or perform smaller, more controlled movements until you build confidence and strength.
- Benefits: An advanced core exercise that significantly improves rotational stability, anti-extension strength, and overall core endurance, which are vital for athletic performance and daily functional movements.
2. Ball Exchange
- Starting Position: Lie flat on your back on the floor, extending your legs out long and your arms stretched overhead, holding the physio ball securely between your hands. Ensure your lower back is pressed firmly into the floor to maintain spinal integrity.
- Movement: Inhale, then as you exhale, simultaneously bring your legs and arms towards the center of your body. Lift your head and shoulders off the floor, bringing your knees towards your chest and your hands (holding the ball) towards your shins. Carefully and with control, transfer the physio ball from your hands to between your ankles, securing it firmly.
- Return: With the ball now secured between your ankles, slowly lower your legs back to the floor and your arms (now without the ball) back overhead, extending your body long once again. On the next repetition, bring your legs and arms back to the center to transfer the ball from your ankles back to your hands, completing the exchange. Continue alternating the ball exchange.
- Key Form Cues: Keep your lower back pressed into the mat throughout the entire exercise to protect your spine. Control the movement, especially the lowering phase, which is often overlooked. Engage your entire core to facilitate the smooth and stable transfer of the ball.
- Muscles Worked: Develops comprehensive abdominal strength (upper and lower rectus abdominis, obliques), hip flexors, and improves coordination.
- Modification: If a physio ball is unavailable, use a small pillow, a soft medicine ball, or even a rolled-up towel. If lifting both legs and arms simultaneously is too challenging, perform leg raises with a ball between your ankles while keeping your upper body still, or perform crunches while holding the ball overhead.
- Benefits: Develops comprehensive abdominal strength, improves coordination, and challenges both upper and lower core muscles in a dynamic fashion, enhancing overall trunk stability and power.
The “Varsity” Challenge: Go for More!
Feeling exceptionally strong and ready for an extra push? For the ultimate fat-burning and muscle-building experience, consider completing this entire circuit one more time after a short rest (e.g., 2-3 minutes). This “Varsity” round will significantly increase your total workout volume, extend your time under tension, and dramatically boost your metabolic demand, pushing your body further towards its fitness goals and accelerating your results.
After Your Workout: The Essential Cool-Down & Static Stretch
Just as important as the warm-up, a cool-down helps your body gradually transition from intense activity back to a resting state. Spend 5-10 minutes performing static stretches, holding each stretch for 20-30 seconds without bouncing. Focus on the major muscle groups worked intensely during the workout:
- Quad Stretch: Standing or lying on your side, gently pull your heel towards your glute.
- Hamstring Stretch: Seated forward fold, or standing with one heel on an elevated surface.
- Glute Stretch: Figure-four stretch (lying on your back, ankle over opposite knee).
- Chest Stretch: Standing in a doorway, or lying on your back with arms out to the sides.
- Triceps Stretch: Arm overhead, bending at the elbow and gently pulling with the opposite hand.
- Bicep Stretch: Extend arm back, palm up, gentle pressure on fingers.
- Core Stretch: Gentle cobra pose (lying face down, lift chest gently) or child’s pose.
Stretching helps improve flexibility, reduce muscle soreness (DOMS), and promotes faster recovery, preparing you for your next session.
Fueling Your Success: Nutrition and Hydration are Key
Remember that a great workout is only one part of the equation for achieving your fitness goals. To truly maximize your fat burning, strength gains, and overall well-being, proper nutrition and adequate hydration are absolutely crucial. Ensure you’re consistently consuming a balanced diet rich in whole, unprocessed foods, lean proteins for muscle repair, healthy fats for energy and hormone function, and complex carbohydrates for sustained energy. Drink plenty of water before, during, and after your workout to stay hydrated, support metabolic functions, and aid in recovery.
Listen to Your Body & Stay Consistent for Long-Term Results
This is a high-intensity workout, and it’s absolutely essential to listen to your body’s signals. Modify exercises as needed, take extra rest if required, and never push through sharp pain. Your safety and long-term health are paramount. Consistency, rather than sporadic intensity, is the true key to long-term success in fitness. Aim to incorporate this or similar HIIT workouts into your routine 2-3 times a week, allowing for adequate rest and recovery days between intense sessions. Celebrate your progress and enjoy the journey!
Disclaimer: Please consult your doctor or a qualified healthcare professional before starting any new fitness regime, especially if you have pre-existing health conditions, injuries, or concerns. While fitness professionals may have consulted for the creation of this workout program, you are participating at your own risk. It is crucial to modify exercises to suit your current fitness level and listen carefully to your body’s signals throughout your workout. Discontinue any exercise that causes pain or discomfort. Your safety and well-being are paramount.