
Sun’s Out, Guns Out: Ultimate Upper Body Strength & Cardio Workout for Summer
Welcome to the ultimate “Sun’s Out, Guns Out” upper body workout designed to sculpt powerful arms, shoulders, and back, while boosting your overall fitness this summer! This comprehensive strength training routine combines targeted exercises with a cardio warm-up to help you achieve a toned and defined physique. Whether you’re aiming for increased strength, improved muscle definition, or simply a more confident feel in your summer attire, this workout is crafted to deliver impressive results. Get ready to challenge yourself, build impressive upper body power, and embrace the sun with confidence!
Building strong upper body muscles isn’t just about aesthetics; it’s fundamental for daily activities, sports performance, and injury prevention. From carrying groceries to improving your posture, a strong back, chest, and arms contribute significantly to your overall well-being. Coupled with an effective cardio element, this program ensures you not only gain strength but also enhance your cardiovascular health and endurance, making it a truly holistic approach to summer fitness. Prepare to transform your body and elevate your fitness journey with this dynamic and engaging workout.
Workout Overview: Gear Up for Strength and Stamina!
Essential Equipment You’ll Need:
- Light, Medium, and Heavy Dumbbells: A selection of weights is crucial. Using various dumbbell weights allows for progressive overload, enabling you to challenge different muscle groups effectively and adapt as your strength improves.
- Sturdy Chair or Bench: A stable surface is essential for certain exercises, particularly for performing tricep dips with proper form and safety. Ensure it’s robust enough to support your body weight.
Pre-Workout Warm-Up: Fueling Your Body for Peak Performance
20-Minute Light Run: Prior to diving into the strength circuit, begin your session with a dynamic and effective warm-up. A light run for 20 minutes is an excellent way to elevate your heart rate gradually, increase blood flow to your muscles, and prepare your joints and tissues for the strenuous work ahead. This can be a comfortable jog outdoors, a steady pace on a treadmill, or even a brisk walk if you’re just starting your fitness journey. Focus on getting your muscles warm and your joints mobile. Following your run, consider incorporating 5-10 minutes of dynamic stretches such as arm circles, torso twists, leg swings, and hip rotations to further enhance flexibility and significantly reduce the risk of injury during your workout.
Workout Structure: Maximizing Your Gains
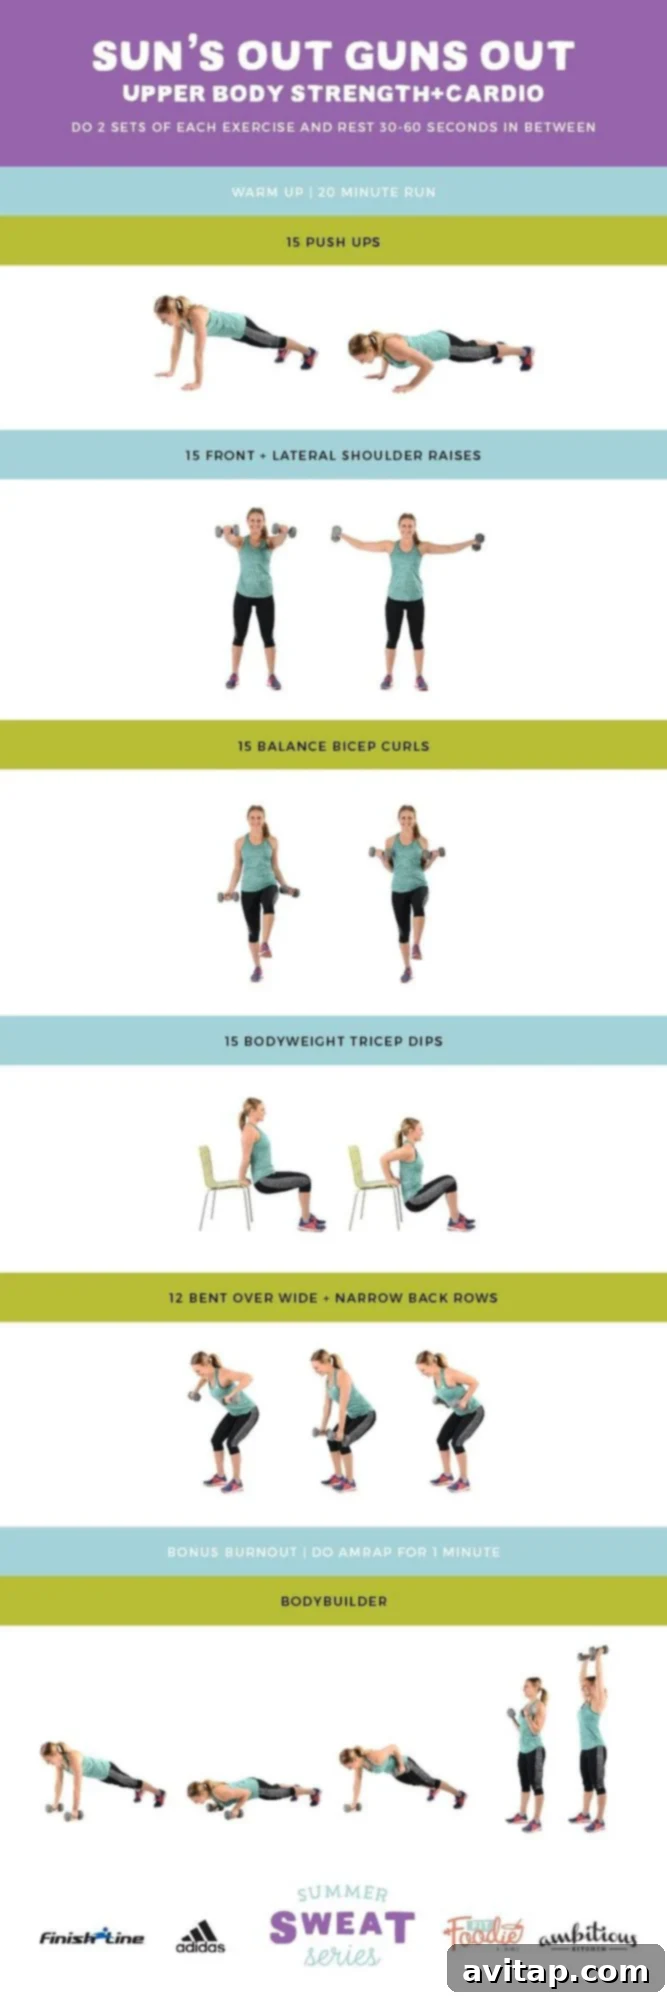
This circuit-style workout is meticulously designed for both efficiency and effectiveness, ensuring you hit every major upper body muscle group. You will perform 2 sets of each exercise listed in the circuit. After successfully completing all repetitions for a given exercise, take a brief rest period of 30-60 seconds to allow for partial recovery before seamlessly transitioning to the next movement. Once you’ve completed one full round of all the exercises in the circuit, allow yourself a slightly longer rest break of 1-2 minutes to fully recover before starting your second and final set of the entire circuit. Remember, the emphasis should always be on quality over quantity: concentrate intently on maintaining proper form throughout each repetition for maximum muscle activation, optimal benefit, and to prevent potential injuries. Consistent form is key to unlocking your full potential.
The “Sun’s Out, Guns Out” Exercise Circuit: Detailed Breakdown
1. Push-ups (15 Reps)
The push-up is a foundational, full-body compound exercise that exceptionally targets your chest (pectorals), shoulders (deltoids), and the back of your arms (triceps), while simultaneously engaging your core muscles for robust stability. It is an indispensable movement for developing functional upper body strength and overall bodily control.
- Starting Position: Initiate the exercise in a high plank position. Ensure your shoulders are perfectly stacked directly over your wrists, with your fingers spread wide to create a stable base and distribute your weight evenly. Actively engage your core by pulling your kneecaps up towards your belly button and pushing your heels towards the imaginary wall behind you. Your body should form one rigid, straight line from the crown of your head to your heels.
- Maintain Optimal Form: Throughout the exercise, maintain this rigid, straight body line, ensuring your back remains flat and your neck is aligned neutrally with your spine. Your gaze should be directed slightly in front of your hands to help maintain this neutral neck alignment.
- Lowering Phase (Eccentric Control): Slowly and with absolute control, lower your chest down towards the ground. It is critical to keep your elbows “pinned” close to your sides, pointing directly backward, rather than allowing them to flare out to the sides. Continue to maintain that perfect straight body line – your head, chest, and legs should descend as one unified unit.
- Pushing Up (Concentric Power): Once your chest is just above the ground (or as low as your flexibility allows while strictly maintaining form), powerfully push back up into the high plank starting position, fully extending your arms without locking your elbows at the top.
- Repetition: Complete 15 controlled repetitions, focusing on a smooth, consistent movement pattern throughout the entire range of motion.
Tips for Success & Progression: If 15 traditional push-ups prove too challenging initially, modify the exercise by performing them on your knees, or by elevating your hands on a sturdy surface like a bench, chair, or even a wall to reduce the resistance. To progress and increase difficulty, try slowing down the lowering (eccentric) phase of the movement, or elevate your feet on a step to increase the load on your upper body.
2. Front + Lateral Shoulder Raises (12 Reps)
This dynamic combination exercise effectively targets all three heads of your deltoid muscles (anterior, lateral, and posterior shoulders), providing comprehensive shoulder development, promoting a well-rounded upper body aesthetic, and significantly improving shoulder stability and strength. It’s excellent for creating that desired “capped” shoulder look.
- Starting Position: Stand tall and erect in a neutral position with your feet positioned shoulder-width apart and a slight, soft bend in your knees to prevent locking. Hold a dumbbell comfortably in each hand at your sides, with your palms facing your body (neutral grip). Gently engage your core to maintain a stable torso.
- Lateral Raise (Side Deltoids): Keeping your arms mostly straight with a slight bend in your elbows, raise the dumbbells out directly to your sides until they are perfectly level with your shoulders, forming a “T” shape with your body. Focus intently on lifting with your shoulders, not swinging the weights with momentum.
- Controlled Descent: Slowly and with absolute control, lower the dumbbells back to your starting position at your sides. Resist the urge to let gravity take over; maintain tension throughout the descent.
- Front Raise (Anterior Deltoids): Without pausing at the bottom, bring your arms in front of your body. Keeping your arms straight with that slight elbow bend, raise the dumbbells straight up in front of you until they reach shoulder level. Your palms can face each other or down towards the floor.
- Controlled Descent: Once again, lower the dumbbells slowly and with control back to the starting position.
- Alternation: Alternate precisely between a lateral raise and a front raise for a total of 12 combined repetitions. For example, you would perform 6 lateral raises and 6 front raises, alternating each rep (e.g., one lateral, then one front, counting as 2 reps) until you reach the combined count of 12.
Tips for Success & Progression: It is crucial to use lighter weights to ensure proper form and to avoid any undue strain on your delicate shoulder joints. If you find yourself shrugging your shoulders or using momentum, reduce the weight immediately. To increase the difficulty, try slowing down the tempo of both the lifting and lowering phases, or slightly increase the weight once you have fully mastered perfect form.
3. Balance Bicep Curls (12 Reps)
This innovative exercise not only effectively isolates and strengthens your biceps, promoting impressive arm development, but it also cleverly incorporates a significant balance challenge. This balance component actively enhances your core stability, improves proprioception (your body’s awareness in space), and makes a traditional bicep curl much more dynamic and functionally beneficial.
- Starting Position: Stand tall in a neutral position with your feet shoulder-width apart. Hold a dumbbell in each hand, comfortably positioned in front of you, with your palms facing outwards, away from your body (supinated grip).
- Balance Challenge Setup: Carefully and deliberately shift all of your body weight over to one standing leg. Lift your other foot slightly off the ground, or simply place the heel of that foot just above the toes of your standing foot, consciously maintaining your balance throughout the entire exercise. Keep your core muscles tightly engaged to assist with stability.
- Curling Phase: While meticulously maintaining your balance on one leg, simultaneously curl both weights upwards towards your shoulders. As you curl, smoothly rotate your palms inward so they face your shoulders at the very top of the movement, maximizing the peak contraction of your biceps. Ensure your elbows remain tucked close to your body and do not swing forward.
- Controlled Descent: Slowly and with unwavering control, lower the dumbbells back to the starting position, fully extending your arms but being careful not to lock your elbows.
- Leg Alternation: Perform the entire first set of 12 repetitions while balancing exclusively on one leg. For your second set, switch to the opposite leg to ensure symmetrical strength development and to continue improving your balance on both sides of your body.
Tips for Success & Progression: If maintaining balance on one leg is initially too difficult, begin with both feet firmly on the ground and gradually progress to the single-leg stance as your balance improves. To intensify the exercise, try holding the peak contraction for a full second, or consider using a slightly heavier weight once your balance and form are perfectly mastered.
4. Tricep Dips on Chair or Bench (12 Reps)
Tricep dips are an incredibly effective bodyweight exercise specifically designed for building impressive strength and definition in the triceps, the vital muscle group located at the back of your upper arm. Utilizing a sturdy chair or bench makes this exercise highly accessible and allows for a wide range of modifications to suit all fitness levels.
- Setup: Position yourself on the very edge of a sturdy chair or bench. Place your hands on the edge of the seat next to your hips, with your knuckles pointing forward or angled slightly outward, gripping firmly. Slide your butt off the chair/bench, supporting your entire body weight with fully straightened arms. It’s crucial to keep your body close to the chair and your shoulders pulled back and down, actively depressing them away from your ears to engage the correct muscles and protect your joints.
- Lowering Phase: Slowly and controllably lower your body down by bending your elbows. It is absolutely crucial that your elbows point directly behind you, not flaring out to the sides, as this targets the triceps more effectively and safely. Maintain complete control throughout this descent.
- Depth: Continue lowering your body until your elbows form approximately a 90-degree angle. Your chest should remain open and lifted, not rounded or collapsed.
- Pushing Up: Powerfully push yourself back up to the starting position, fully extending your arms without locking your elbows at the top. Concentrate intensely on using your triceps to drive the entire upward movement.
- Modification & Progression: For a less challenging version, keep your knees bent and your feet flat on the floor, positioned close to the chair. For increased difficulty and a greater challenge, extend your legs straight out in front of you, or for an advanced progression, elevate your feet on another stable surface.
- Repetition: Repeat this controlled movement for 12 complete repetitions, focusing on the mind-muscle connection with your triceps.
Tips for Success: Always ensure your chosen chair or bench is exceptionally stable to prevent accidents. Actively avoid shrugging your shoulders towards your ears during the dip; keep them depressed and back. To further intensify the muscle burn, try incorporating a 1-2 second pause at the very bottom of the movement before pushing back up.
5. Bent Over Wide + Narrow Back Rows (12 Reps)
This highly effective compound exercise is outstanding for developing a strong, muscular, and well-defined back, precisely targeting both the broad latissimus dorsi and the rhomboids, as well as significantly engaging the biceps. By alternating between wide and narrow grip variations, you intelligently engage different muscle fibers and achieve truly comprehensive back development, contributing to better posture and overall strength.
- Starting Posture: Hold a set of dumbbells, one in each hand, with an overhand grip. Stand with your feet positioned hip-width apart and your knees slightly bent for stability. Hinge forward deeply at your waist, keeping your back perfectly straight and your chest lifted, until your torso is almost parallel to the floor. Crucially, maintain a neutral spine, ensuring your neck is in line with your spine (gaze at the floor a few feet in front of you). The dumbbells should hang directly below your shoulders, with your arms extended perpendicular to the floor. This is your precise starting position.
- Wide Row Execution: Keeping your torso absolutely stationary and your core tightly engaged, exhale as you powerfully lift the dumbbells up towards your chest. For the wide row, actively drive your elbows outwards, away from the sides of your body, focusing intensely on squeezing your shoulder blades together at the very top of the movement. Hold this contracted position briefly for maximal muscle activation.
- Controlled Descent (Wide): Inhale deeply and slowly lower the dumbbells back to the starting position, maintaining complete control throughout the entire range of motion and resisting gravity.
- Narrow Row Execution: For the narrow row, perform the same powerful upward movement, but consciously keep your elbows tucked tightly to your body, allowing them to graze your rib cage as you pull the weights up. Again, squeeze your back muscles hard at the peak of the contraction.
- Controlled Descent (Narrow): Inhale and slowly lower the dumbbells back to the starting position with precision.
- Alternation: Alternate precisely between wide and narrow back rows for a total of 12 powerful repetitions. For example, you would perform 6 wide rows and 6 narrow rows, alternating each rep (e.g., one wide, then one narrow, counting as 2 reps) until you reach the combined count of 12.
Tips for Success: Absolutely avoid rounding your back at any point during this exercise, as this can lead to injury. If you feel any strain in your lower back, your weights might be too heavy, or your form needs immediate adjustment. Focus intently on pulling the weights using your strong back muscles, not just your arms. Utilizing a mirror can be incredibly helpful for consistently checking and correcting your form.
6. 1-Minute Bonus Burnout – The Body Builder (Tricep Push Up + Renegade Row + Bicep Curl + Overhead Press)
This incredibly dynamic, multi-compound exercise serves as a fantastic full-body finisher, ingeniously combining a tricep push-up, an alternating renegade row, a bicep curl, and an overhead press into one seamless and powerful sequence. It is specifically designed to thoroughly burn out your upper body and core in a short, intense burst of activity, pushing your endurance to its limits.
- Starting Position: Begin in a high plank position, with your hands gripping the dumbbells firmly directly under your shoulders. Ensure your shoulders are perfectly stacked over your wrists, maintaining a strict straight line from the crown of your head to your heels. Keep your back flat, core tightly engaged, and neck aligned neutrally with your spine.
- Tricep Push-Up: Perform a tricep push-up by lowering your chest towards the ground, being sure to keep your elbows pinned closely to your sides. Powerfully push back up into the high plank position.
- Renegade Row: Immediately following the push-up, execute an alternating renegade row. Keeping your hips as stable and square to the floor as possible (minimize rotation), pull one dumbbell up towards the ceiling and back towards your hip, actively engaging your back muscles. Lower it slowly with control, then repeat the same motion on the other side.
- Transition to Standing: After successfully completing both renegade rows, quickly step or jump your feet forward towards your hands, seamlessly transitioning into a standing position while still holding the dumbbells.
- Bicep Curl: From your standing position, immediately perform a bicep curl. Curl the dumbbells smoothly upwards, simultaneously rotating your palms inward so they face your shoulders at the peak of the movement, maximizing bicep contraction.
- Overhead Press: Without pausing at the top of the curl, fluidly rotate your palms outwards, away from your body, and powerfully press the dumbbells directly overhead into an overhead shoulder press. Maintain a tight core throughout this movement to protect your lower back and ensure you lock your elbows out at the very top of your press for full extension.
- Completion: Lower the dumbbells with control back to the starting position (either at your sides or ready for the next curl), then immediately return to the high plank position with the dumbbells on the floor to repeat the entire challenging sequence. Continue performing this full “Body Builder” sequence for a full 1 minute, aiming for as many controlled and well-executed repetitions as possible.
Tips for Success & Safety: This is an advanced and highly demanding movement. It is strongly recommended to start with lighter weights to thoroughly master the complex form and coordination. Focus intensely on maintaining core stability throughout the entire sequence, especially during the renegade rows, to prevent any unwanted hip rotation. Breathe consistently and powerfully through each individual component of the exercise to maintain energy and focus.
Post-Workout Recovery and Next Steps: Optimize Your Results
Congratulations on completing your intense “Sun’s Out, Guns Out” workout! The effort you put in today is commendable. Now, don’t overlook the critical importance of proper recovery, as it’s equally vital for muscle growth and injury prevention. After your final set, dedicate 5-10 minutes to a thorough cool-down session involving static stretches. Focus specifically on stretching your chest, shoulders, biceps, triceps, and back muscles. Hold each stretch for a sustained 20-30 seconds, feeling a gentle pull rather than pain. This practice can significantly improve your flexibility, enhance range of motion, and crucially aid in muscle recovery by reducing soreness.
Beyond stretching, hydration and nutrition are paramount for optimal recovery. Make sure to refuel your body with a balanced meal rich in lean protein and complex carbohydrates within an hour or two post-workout. This helps replenish glycogen stores and provides the necessary building blocks for muscle repair and growth. For optimal results and to continuously progress towards your fitness goals, aim to perform this comprehensive upper body strength and cardio routine 2-3 times per week, ensuring you allow at least one full rest day in between sessions for adequate muscle recovery and adaptive growth. Always listen intently to your body’s signals, and don’t hesitate to modify exercises or take extra rest when needed. Consistency, combined with smart training and recovery, is the ultimate secret to achieving your fitness goals and confidently showcasing those “guns” all summer long and beyond!