
Mastering Kitchen Measurements: Your Essential Guide to Teaspoons, Tablespoons, and More
Navigating the world of kitchen measurements can sometimes feel like solving a complex puzzle, even for seasoned home cooks. Questions like, “How many teaspoons in a tablespoon?” or “How many ounces are in a cup?” are incredibly common. Accurate measurement is the bedrock of successful cooking and especially baking, ensuring consistent results, perfect textures, and delicious flavors in every dish. This comprehensive guide is designed to demystify kitchen conversions, provide essential tips, and empower you with the knowledge to measure ingredients with confidence and precision.
How Many Teaspoons in a Tablespoon? The Fundamental Conversion
Let’s address one of the most frequently asked questions right away, a conversion that forms the basis for many kitchen calculations:
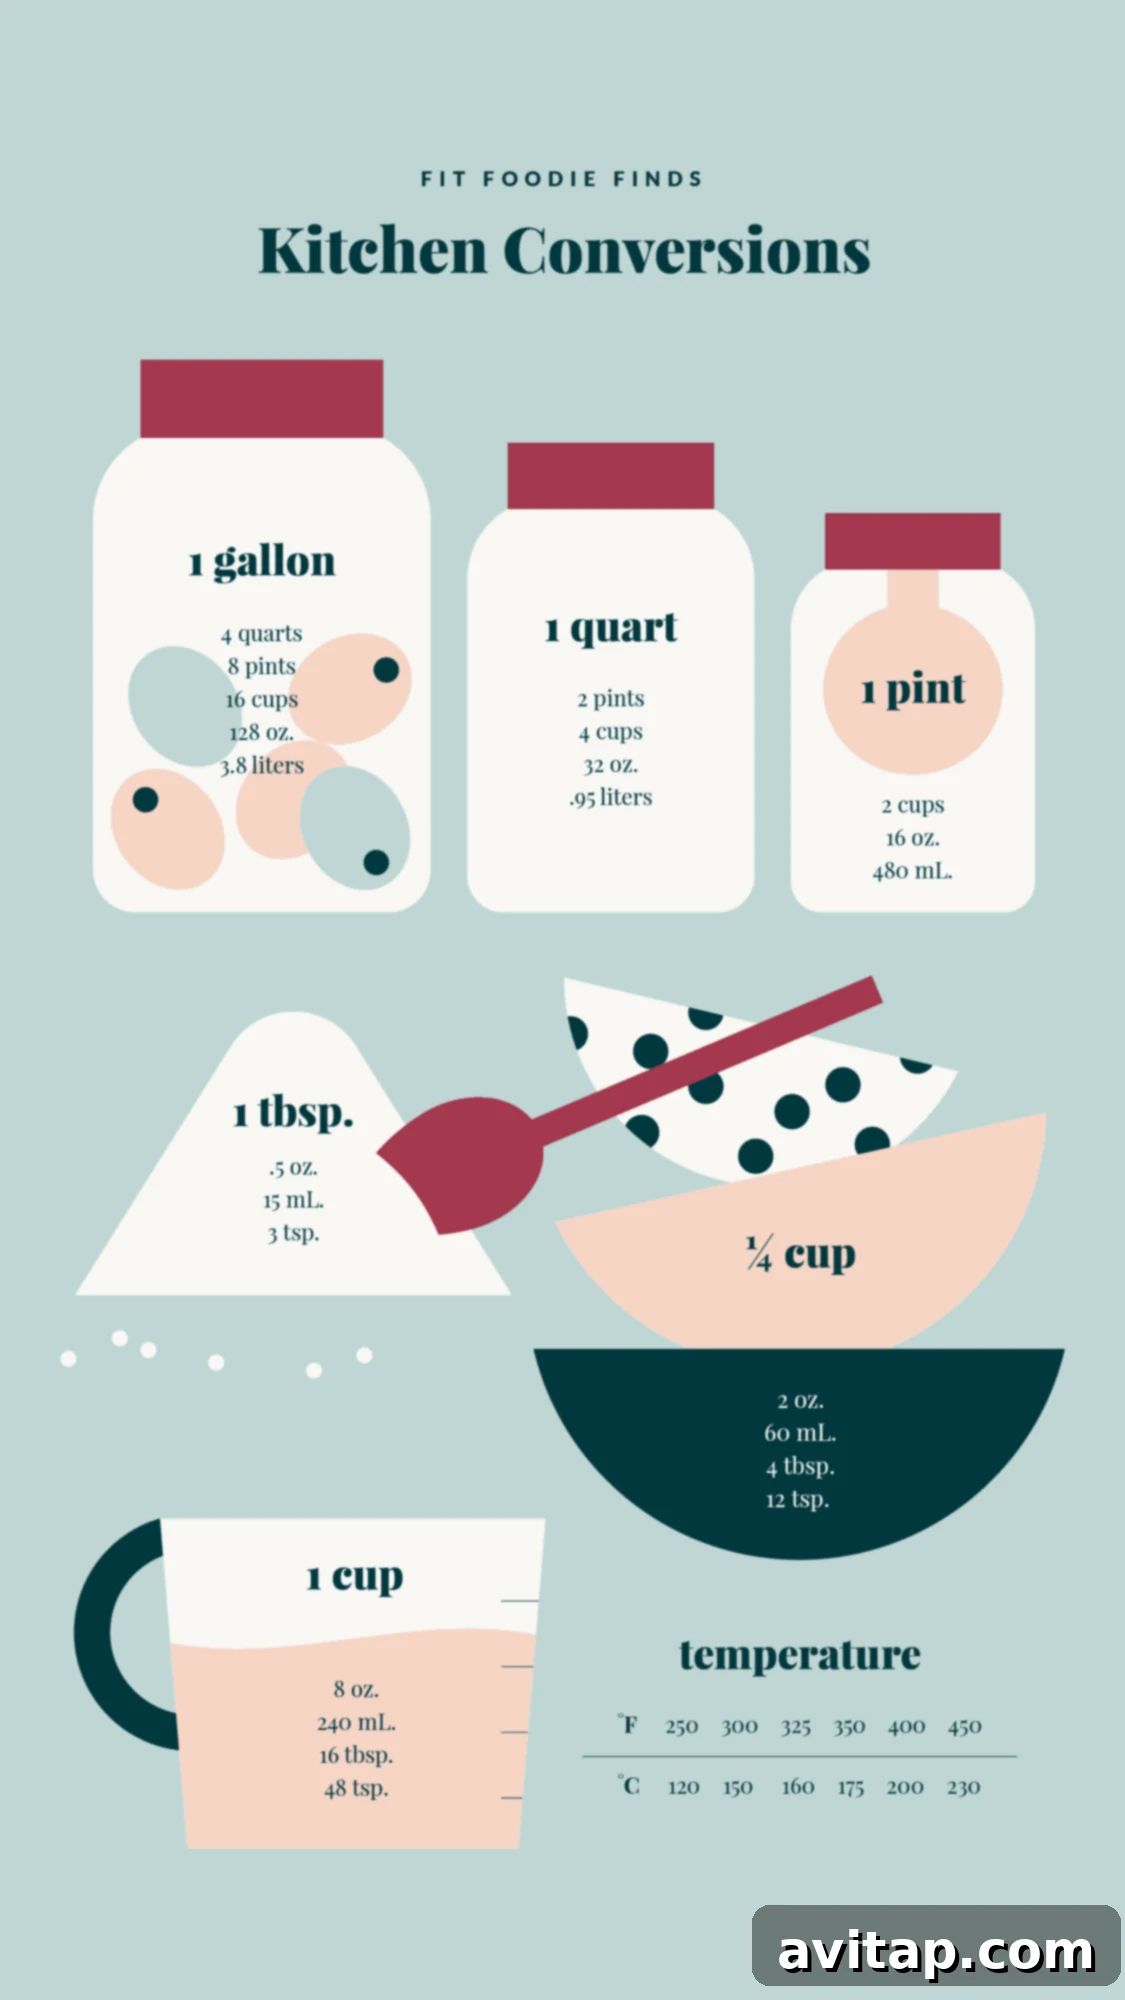
There are 3 teaspoons in 1 tablespoon.
This fundamental conversion is a cornerstone of kitchen arithmetic. Whether you’re doubling a beloved cookie recipe, halving a soup for a smaller crowd, or simply trying to recall the ratio in the middle of a busy cooking session, knowing that three teaspoons equate to one tablespoon is invaluable. It’s a common moment for many cooks: you’re covered in flour or cookie dough, and suddenly the simplest conversion slips your mind. This guide aims to be your reliable reference, so you can quickly get back to enjoying the process of creating delicious meals.
Understanding this ratio helps immensely when you might only have one type of spoon available, or when a recipe lists ingredients in a unit you’re less familiar with. For instance, if a recipe calls for 2 tablespoons of an ingredient but you only have a teaspoon measure, you’ll know you need 6 teaspoons (2 tablespoons multiplied by 3 teaspoons per tablespoon). Precision in these small measurements, particularly for potent ingredients like spices, extracts, or leavening agents, can significantly impact the final outcome of your dish, making the difference between a perfectly light cake and a dense one, or a subtly flavored sauce and an overpowering one.
Why Accurate Measurement Matters for Culinary Success
Beyond simply knowing the conversions, understanding why accurate measurement is so critical can elevate your cooking and baking to new heights. Here’s why precision pays off in the kitchen, affecting everything from taste to texture:
- Consistency in Results: Accurate measurements ensure that every time you make a dish, it turns out just as good as the last. This eliminates guesswork and helps you reproduce your culinary successes consistently.
- Achieving Desired Texture and Flavor: Especially in baking, the precise ratios of ingredients like flour, sugar, and liquids directly determine the texture (chewy, crumbly, moist) and balance of flavors. Too much flour can make a cake dry and dense; too little can make it collapse. Similarly, incorrect seasoning can throw off the entire flavor profile.
- Preventing Waste: Incorrect measurements can lead to failed recipes that end up in the bin. Precision reduces waste of expensive ingredients and valuable effort, saving you time and money.
- Successful Recipe Scaling: Whether you’re scaling a recipe up to feed a crowd or down for a single serving, accurate conversions are essential to maintain the intended ratios and prevent undesirable results that stem from disproportionate ingredients.
- Understanding Ingredient Ratios: Over time, a keen understanding of measurements helps you intuitively grasp how different ingredients interact. This builds your confidence and makes you a more adaptable and creative cook, capable of improvising and developing your own recipes.
Dry vs. Wet Ingredients: Using the Right Tools for Precision
While it might seem tempting to use any measuring cup for any ingredient, there’s a nuanced difference in how dry and wet ingredients should be measured for optimal accuracy. Using the right tool and technique can significantly impact your results, particularly in baking where precision is paramount due to the delicate balance of ingredients.
Measuring Dry Ingredients
For dry ingredients like flour, granulated sugar, oats, and spices, standard nested measuring cups are your best friend. These cups are designed to be filled to the brim and then leveled off, ensuring you have the exact volume specified by the recipe.
- Recommended Tools: Sets of metal or plastic measuring cups that nest together, typically including 1 cup, 1/2 cup, 1/3 cup, and 1/4 cup sizes. Measuring spoons are used for smaller dry quantities.
- Proper Technique (Spoon and Level Method):
- Gently spoon the dry ingredient into your measuring cup until it’s overflowing. Do not pack it down, unless the recipe specifically states “packed brown sugar.” For flour, it’s best to lightly aerate it first by stirring it in its container.
- Using a straight edge (like the back of a knife or a flat spatula), sweep across the top of the cup to level off the excess ingredient. This removes any dome and ensures an accurate, consistent measure without compacting the ingredient.
- Common Mistakes to Avoid: Scooping directly from a bag or container can compact ingredients like flour, leading to too much being added (which can make baked goods dense or dry). Always fluff flour before spooning it into the cup.
Measuring Wet Ingredients
Liquid ingredients such as water, milk, oils, extracts, and syrups require a different type of measuring vessel – typically a clear, spouted measuring cup with markings on the side. This design allows for accurate reading at eye level.
- Recommended Tools: Clear glass or sturdy plastic liquid measuring cups (e.g., Pyrex) with graduated markings, often in cups, fluid ounces, and milliliters. They usually feature a pour spout for easy, mess-free transfer.
- Proper Technique (Eye-Level Measurement):
- Place the liquid measuring cup on a flat, level surface.
- Carefully pour your liquid into the cup.
- Bend down so your eyes are perfectly level with the desired measurement line. The bottom of the liquid’s surface, known as the meniscus (the slight curve formed by surface tension), should precisely touch the bottom of the measurement line.
- Common Mistakes to Avoid: Measuring from above eye level can lead to inaccurate readings due to parallax error, resulting in adding too much or too little liquid. Using dry measuring cups for large volumes of liquids can also be messy and imprecise, as they lack spouts and clear side markings for accurate reading.
The Ultimate Tool for Both: The Kitchen Scale
For unparalleled accuracy and consistency, especially in baking, a digital kitchen scale is a game-changer. Measuring by weight (grams or ounces) eliminates the variables associated with volume measurements, such as packing density, leveling issues, and the meniscus effect. It provides the most consistent results every single time.
- Benefits: Superior accuracy, less mess (often only one bowl needed for multiple ingredients), easier cleanup, ideal for precise baking recipes, and perfect for accurately converting international recipes that predominantly use metric weights.
- How to Use a Kitchen Scale:
- Place your empty mixing bowl or container directly onto the scale.
- Press the “tare” or “zero” button to reset the display to zero. This effectively subtracts the weight of the container, allowing you to measure only the ingredient.
- Slowly add your ingredient until the scale displays the desired weight. You can add multiple ingredients to the same bowl, “taring” the scale to zero after each addition, simplifying the process and reducing dirty dishes.
- Recommendation: While volume measurements are convenient for general cooking, serious bakers and those aiming for professional-level results will find a kitchen scale an indispensable tool. It guarantees consistent outcomes, particularly for critical ingredients like flour, sugar, and butter.
Essential Kitchen Measuring Tools for Every Home Cook
Equipping your kitchen with the right measuring tools is an investment in your culinary success and enjoyment. Here’s a rundown of the indispensable items we recommend having readily available:
- Measuring Spoons: Look for a comprehensive set that typically includes 1/4 teaspoon, 1/2 teaspoon, 1 teaspoon, and 1 tablespoon. Metal spoons are generally more durable, less prone to staining or absorbing odors, and have clearer, more lasting markings than plastic ones.
- Dry Measuring Cups: A complete set usually includes 1/4 cup, 1/3 cup, 1/2 cup, and 1 cup. Again, metal sets are often preferred for their robustness, ease of leveling ingredients, and ability to handle both hot and cold substances. Some larger sets may also include 1.5-cup or 2-cup capacities, which can be convenient for larger batches.
- Liquid Measuring Cups: You’ll likely want at least one medium-sized 2-cup (or 500ml) capacity liquid measuring cup, and a larger 4-cup (or 1-liter) one for bigger preparations. Opt for clear glass or sturdy, heat-resistant plastic with easy-to-read, contrasted markings in cups, fluid ounces, and milliliters for maximum versatility.
- Digital Kitchen Scale: As previously discussed, this is a must-have for precision. Choose a scale that measures accurately in both grams and ounces, features a clear digital display, and includes a “tare” (zero) function. Consider its maximum weight capacity and how easily it can be stored.
- Straight Edge or Leveler: While the back of a butter knife works perfectly well, a small, dedicated straight edge or spatula can make leveling dry ingredients even easier and more hygienic, especially for baking.
Having a well-stocked arsenal of reliable measuring tools means you’re always prepared, no matter what recipe you tackle. Investing in good quality tools will save you frustration, improve your accuracy, and ensure more delicious outcomes for years to come.
Cooking Measurement Abbreviations: Your Quick Reference Guide
Recipes often use abbreviations to save space, and understanding these shorthand notations is crucial for accurately following instructions. Here’s a handy list of common measurement abbreviations for both metric and standard (imperial) systems:
Metric Measurement Abbreviations
- mL. = Milliliter
- kg. = Kilogram
- L. = Liter
- g. = Grams
Standard (Imperial) Measurement Abbreviations
- lb. = Pound
- gal. = Gallon
- pt. = Pint
- qt. = Quart
- c. = Cup
- fl. oz. = Fluid ounce
- oz. = Ounce (by weight)
- tsp. = Teaspoon
- Tbsp. = Tablespoon
Demystifying Common Kitchen Measurement Questions
Let’s delve deeper into some frequently asked questions that often cause confusion in the kitchen, providing clear explanations to ensure you’re always on the right track and confident in your measurements.
Is There a Difference Between Metric and Imperial Teaspoons/Tablespoons?
Yes, there is indeed a subtle difference! An imperial teaspoon (historically used in the UK and some Commonwealth countries, though increasingly standardizing to metric) is slightly larger than a metric teaspoon (approximately 5.9 mL vs. 5 mL). Similarly, an imperial tablespoon (which can vary, often 15 mL or 17.7 mL depending on the region) can differ from a US tablespoon (14.79 mL). While these differences are minor for very small quantities in everyday cooking, they can become significant when scaling recipes, especially for baking, or when using recipes from different international sources. Always be mindful of the recipe’s origin if precision is critical, and consider converting to a single system (like grams) for utmost accuracy.
What Is the Difference Between Ounces and Fluid Ounces?
This is one of the most common sources of confusion in the kitchen! While both are units of measurement, they measure fundamentally different properties:
- Ounces (oz.): This unit measures weight. You’d use ounces when measuring solid ingredients like flour, sugar, meat, or chocolate using a kitchen scale. For example, a recipe might call for “8 oz of chicken breast” or “10 oz of chocolate chips.”
- Fluid Ounces (fl. oz.): This unit measures volume. You’d use fluid ounces for liquids, typically with a liquid measuring cup. For example, a recipe might call for “8 fl. oz. of milk” or “4 fl. oz. of orange juice.”
The key takeaway is that while 8 fluid ounces of water happens to weigh approximately 8 ounces, this convenient equivalency does not hold true for other ingredients. For example, 8 fluid ounces of honey will weigh significantly more than 8 ounces, and 8 fluid ounces of flour will weigh considerably less. This crucial distinction highlights why a kitchen scale (for weight) and a liquid measuring cup (for volume) are both essential and serve different purposes.
What is a “Dash,” “Pinch,” or “Smidge”?
These are informal measurements typically used for very small quantities, especially of spices or seasonings where exact precision isn’t paramount, and a slight variation won’t compromise the dish. Generally, they represent progressively smaller amounts:
- Dash: Approximately 1/4 of a teaspoon. Often used for liquids or finely ground spices.
- Pinch: Roughly 1/8 of a teaspoon, or the amount that can comfortably be held between your thumb and forefinger. Commonly used for salt or potent spices.
- Smidge: The smallest, often less than 1/16 of a teaspoon. Used for extremely potent ingredients where only a tiny amount is needed.
While these terms are acceptable for ingredients added to taste, they should not be relied upon for critical components like baking powder or soda, where precise measurements are crucial for chemical reactions.
Comprehensive Kitchen Conversion Chart: Your Go-To Reference
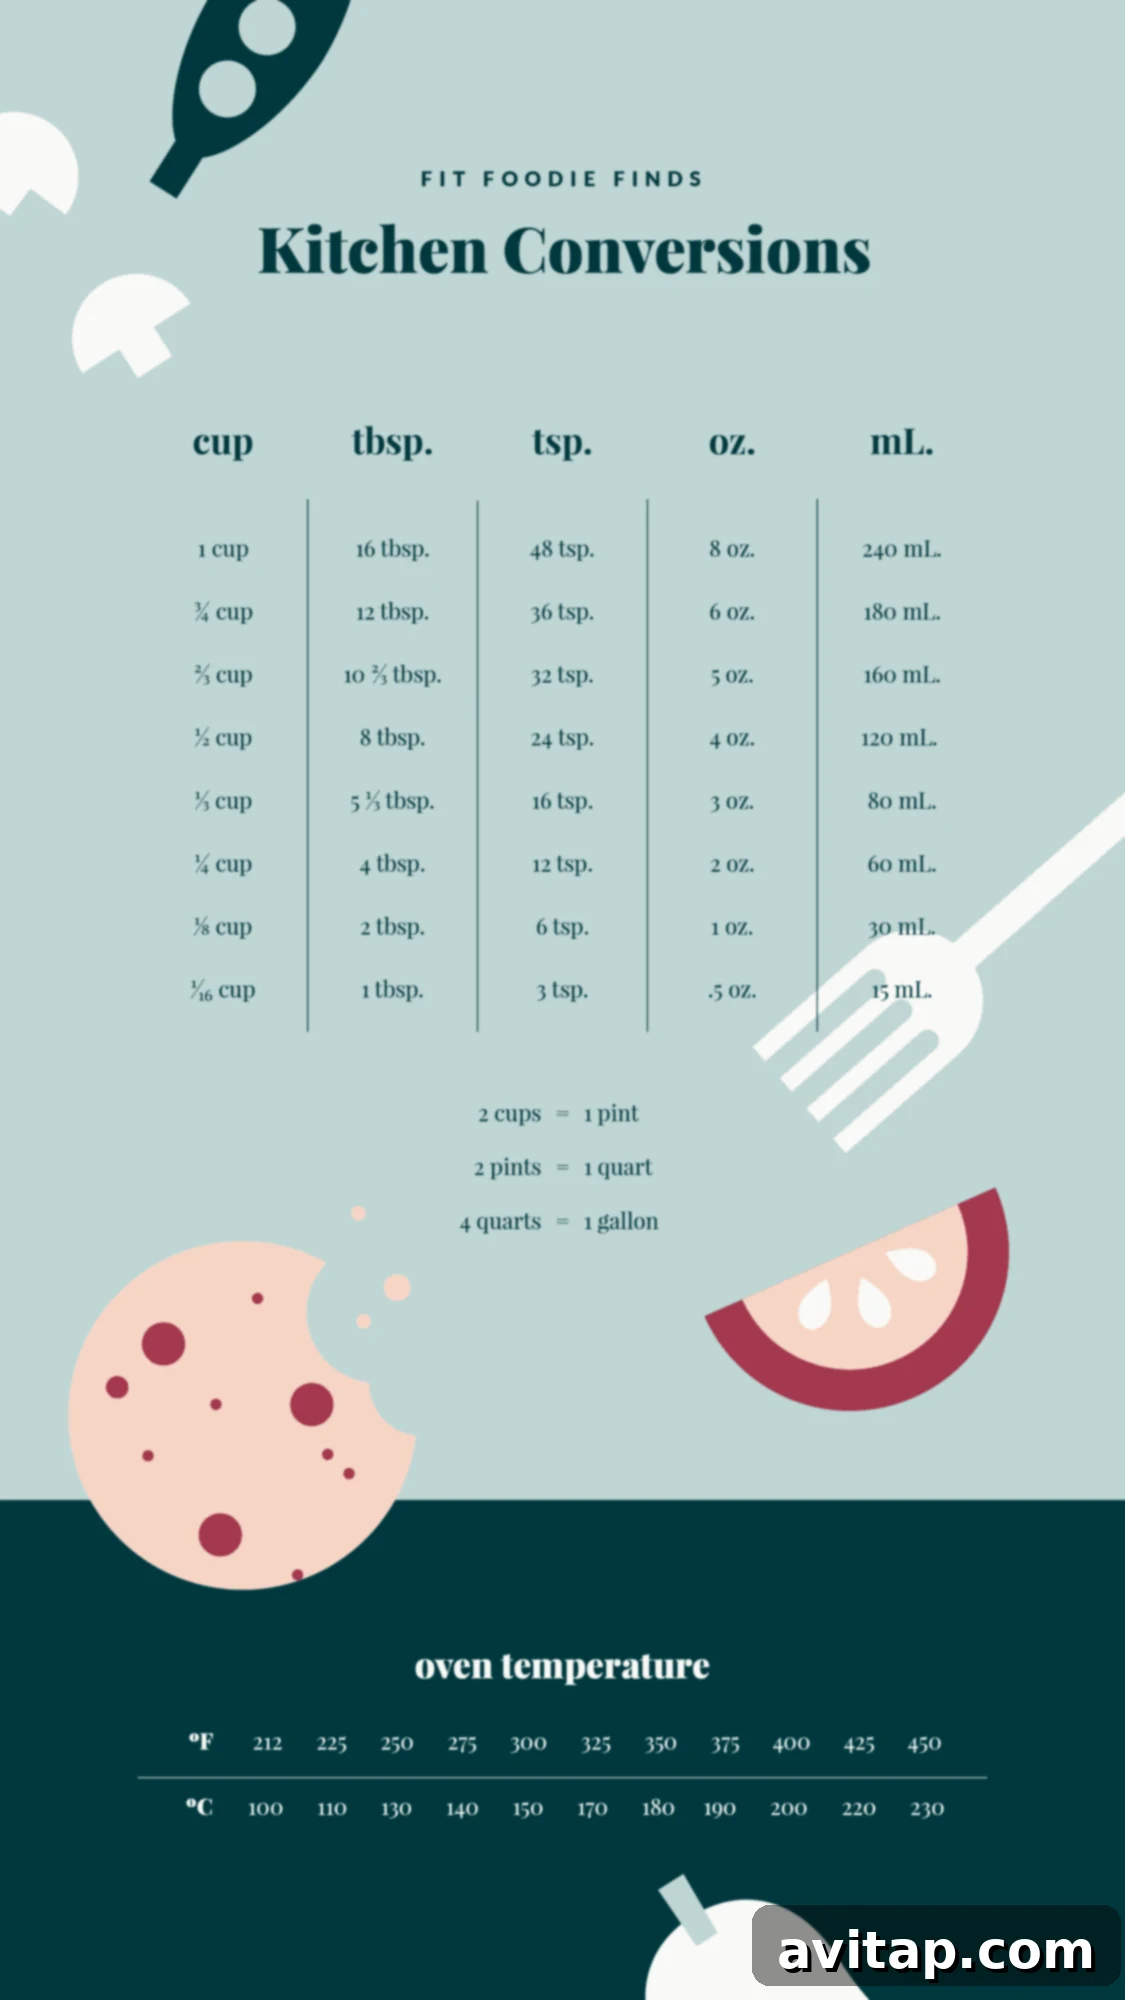
Having all your essential kitchen conversions in one place can save you valuable time and hassle, preventing those mid-recipe scrambles. Bookmark this section or consider printing it out for quick reference when you’re in the thick of a recipe. This chart covers common volume and weight conversions that every home cook should know.
Volume Conversions (Standard US Units)
- Teaspoons to Tablespoons: 3 teaspoons = 1 tablespoon
- Tablespoons to Fluid Ounces: 2 tablespoons = 1 fluid ounce
- Tablespoons to Cups: 16 tablespoons = 1 cup
- Fluid Ounces to Cups: 8 fluid ounces = 1 cup
- Cups to Pints: 2 cups = 1 pint
- Pints to Quarts: 2 pints = 1 quart
- Cups to Quarts: 4 cups = 1 quart
- Quarts to Gallons: 4 quarts = 1 gallon
- Cups to Gallons: 16 cups = 1 gallon
- Fluid Ounces to Gallons: 128 fluid ounces = 1 gallon
Volume Conversions (Metric Equivalents – US Standard)
- Teaspoon to Milliliters: 1 teaspoon ≈ 5 milliliters
- Tablespoon to Milliliters: 1 tablespoon ≈ 15 milliliters
- Cup to Milliliters: 1 cup (US) ≈ 236.6 milliliters
- Pint to Milliliters: 1 pint (US) ≈ 473 milliliters
- Quart to Liters: 1 quart (US) ≈ 0.946 liters
- Gallon to Liters: 1 gallon (US) ≈ 3.785 liters
- Liter to Fluid Ounces: 1 liter ≈ 33.8 fluid ounces
Weight Conversions
- Ounces to Pounds: 16 ounces = 1 pound
- Grams to Ounces: 1 ounce ≈ 28.35 grams
- Pounds to Grams: 1 pound ≈ 453.6 grams
- Kilograms to Pounds: 1 kilogram ≈ 2.2 pounds
Practical Tips for Flawless Measuring in the Kitchen
Beyond knowing the conversions, adopting best practices for measuring can significantly improve your cooking and baking outcomes. Here are some pro tips to help you achieve consistent precision:
- Always Level Dry Ingredients: For consistent results, especially with flour and granulated sugar, use the spoon-and-level method. Scoop the ingredient into the cup, then sweep off the excess with a straight edge.
- Measure Liquids at Eye Level: Avoid parallax error by bending down to ensure the liquid’s meniscus aligns perfectly with the desired mark on your clear measuring cup.
- Don’t Measure Over Your Mixing Bowl: Prevent accidental spills or over-measurements from ruining your entire batch. Measure ingredients over a separate container or directly onto the countertop.
- Pack Brown Sugar (and Solid Fats): When a recipe calls for brown sugar, pack it firmly into the measuring cup so it holds its shape when inverted. Similarly, solid fats like butter or shortening should be packed down to remove air pockets.
- Bring Ingredients to Room Temperature: For many baking recipes, ingredients like butter and eggs should be at room temperature. This affects their volume, how they emulsify, and ultimately the final texture of your baked goods.
- Grease Your Measuring Tools for Sticky Ingredients: If measuring sticky ingredients like honey, molasses, or syrup, lightly coat your measuring cup or spoon with cooking spray or oil beforehand. This simple trick allows for easy release and cleanup.
- Read the Recipe Carefully: Always pay close attention to whether a recipe specifies “fluid ounces” or “ounces by weight,” or “packed” vs. “sifted” flour. These distinctions are critical for accuracy.
- Zero Out Your Scale: Regularly check that your kitchen scale is tared to zero before adding any ingredients or when switching containers.
Conclusion: Cook with Confidence and Precision
Mastering kitchen measurements is a journey that every cook, from novice to expert, undertakes. Understanding fundamental conversions like “how many teaspoons in a tablespoon” is just the beginning. By utilizing the right tools, employing accurate techniques for both dry and wet ingredients, and keeping a handy conversion chart at your side, you’ll eliminate guesswork and unlock a new level of confidence in your culinary endeavors.
No longer will you be scrambling for your phone with floury hands; instead, you’ll approach every recipe with the assurance that your measurements are spot on, leading to consistently delicious and perfectly executed dishes. Embrace the precision, and enjoy the rewarding art of cooking and baking!