
Unleash Your Potential: The Ultimate Full Body Cardio & Strength Workout for Peak Fitness
Are you ready to elevate your fitness journey and achieve remarkable results? This ultimate full-body workout is meticulously designed to transform your physique, blending the exhilarating, calorie-incinerating power of cardio with the targeted, muscle-sculpting benefits of strength training. Prepare to challenge your limits, ignite your metabolism, and leave every session feeling accomplished and energized.
This dynamic circuit is engineered for efficiency, targeting every major muscle group while simultaneously boosting your cardiovascular endurance. Whether your goal is significant fat loss, enhanced muscle definition, or simply a robust improvement in overall fitness, this workout offers a comprehensive solution. Get ready to sweat, strengthen, and redefine what’s possible for your body!
Why Combine Cardio and Strength Training? The Synergistic Advantage
While often treated as separate entities, integrating cardio and strength training into a single workout delivers unparalleled benefits. This synergy accelerates your fitness progress and optimizes your body’s capabilities in multiple ways:
- Maximized Fat Loss: Cardio burns calories during the workout, while strength training builds muscle, which in turn boosts your resting metabolism. This means your body continues to burn calories at a higher rate long after your workout is over.
- Enhanced Muscle Definition: Strength training builds and tones muscles, while cardio helps to reduce the layer of fat covering them, revealing a more defined and sculpted physique.
- Improved Endurance & Stamina: Regular cardio strengthens your heart and lungs, improving your body’s ability to sustain effort. Strength training builds resilience, making daily tasks and other physical activities feel easier.
- Better Bone Density: Weight-bearing exercises, common in both strength training and certain cardio activities, are crucial for maintaining and improving bone density, reducing the risk of osteoporosis.
- Increased Overall Health: Combining these two forms of exercise contributes to improved cardiovascular health, better blood sugar regulation, reduced stress, and enhanced mental well-being.
- Time Efficiency: A full-body circuit like this allows you to hit all your fitness goals in one efficient session, perfect for busy schedules.
Before You Begin: Essential Preparations
To ensure a safe and effective workout, please take note of the following:
Equipment Needed:
- Medium-size dumbbells
- Physio ball (or stability ball)
Workout Description:
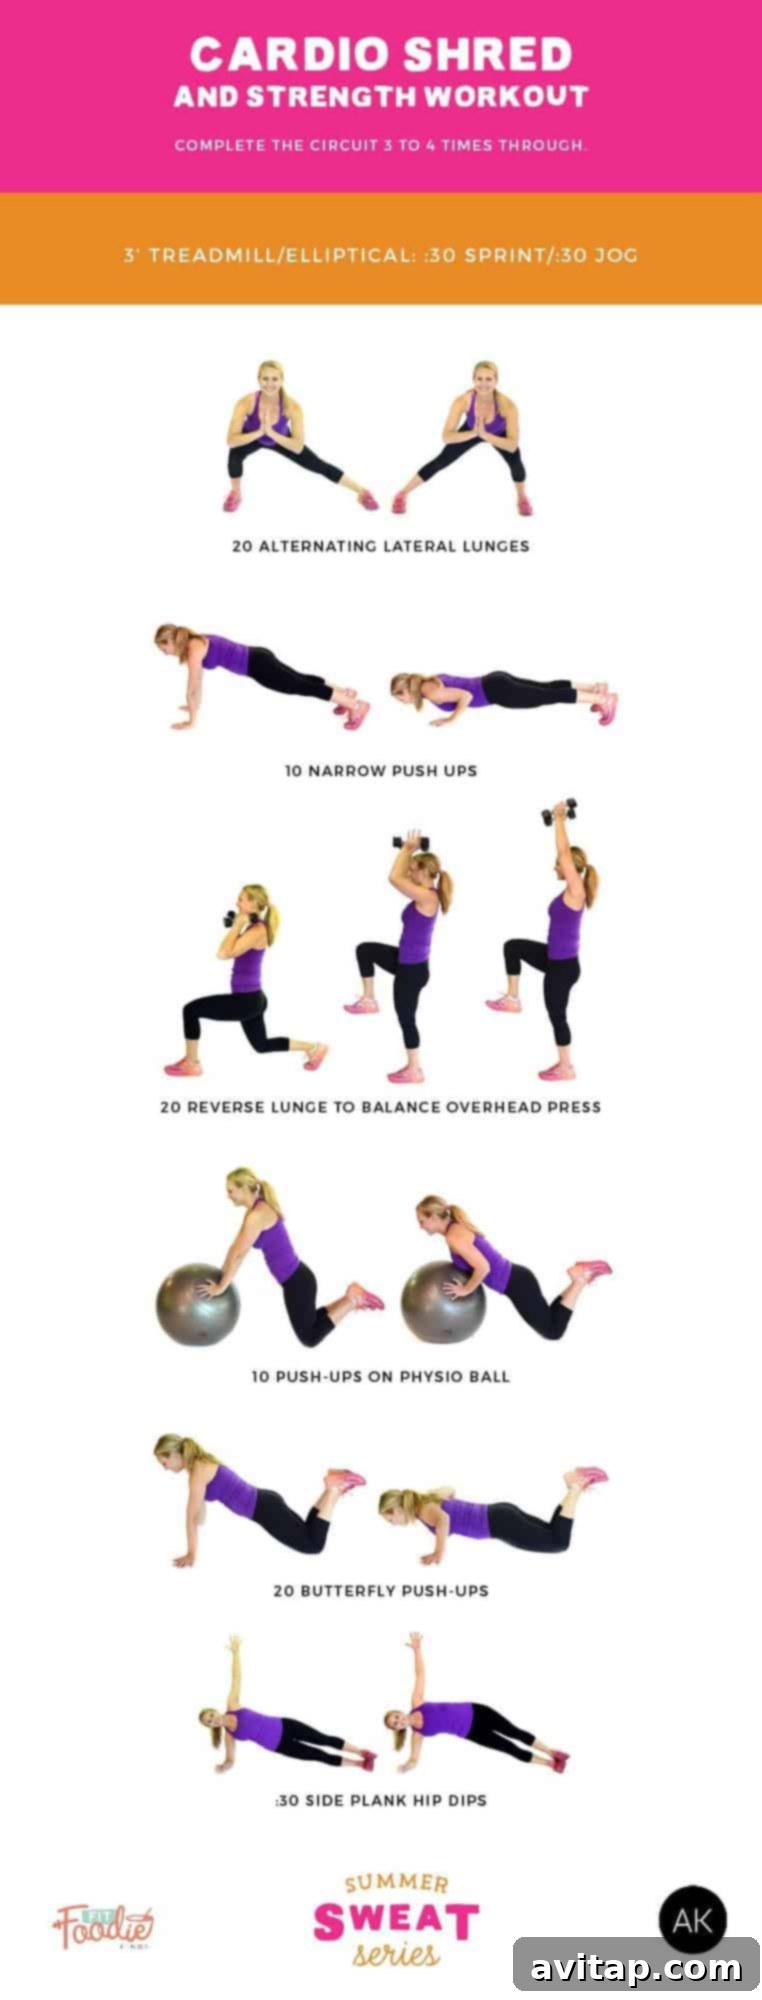
This workout is structured as a circuit. You will complete each exercise in the circuit consecutively with minimal rest between movements. Once you have completed one round of all exercises, that counts as one circuit. Aim to complete the entire circuit 3 to 4 times through. Take a short break (60-90 seconds) between each full circuit if needed.
The Warm-Up: Preparing Your Body for Peak Performance
Never skip your warm-up! A proper warm-up is crucial for injury prevention, enhancing performance, and getting your body physically and mentally ready for the demanding exercises ahead. It gradually increases your heart rate, blood flow to muscles, and improves joint mobility, ensuring your body is primed for action.
Begin with:
- Light Cardio (10 minutes): Start with a light, 1-mile jog on the treadmill (or outdoors) or 10 minutes of easy-paced work on the elliptical. The goal is to gently elevate your heart rate and increase blood flow without causing fatigue.
- Dynamic Stretches (5 minutes): Follow your cardio with some dynamic stretches to loosen up your joints and activate key muscle groups. Consider movements like arm circles, leg swings (forward/backward and side-to-side), torso twists, and walking lunges without weights.
The Ultimate Full Body Circuit: Exercises & Execution
Now that you’re warmed up, it’s time to dive into the core of the workout. Remember to focus on proper form over speed, and listen to your body. Modify exercises as needed to match your current fitness level.
1. Cardio Blast: Treadmill/Elliptical Intervals (3 Minutes)
Kick off the circuit with a burst of high-intensity interval training (HIIT) to supercharge your metabolism and cardiovascular system. This short, intense burst will elevate your heart rate quickly and prepare your body for the strength exercises.
How to Perform:
- :30 Sprint: Push your pace to a challenging sprint for 30 seconds. You should feel breathless and be giving maximum effort.
- :30 Jog: Immediately reduce your pace to a light jog for 30 seconds, allowing for active recovery.
Repeat this sprint/jog cycle three times for a total of 3 minutes before moving to the next exercise.
2. Alternating Lateral Lunges (20 Reps Total, 10 per Side)
The Alternating Lateral Lunge is a fantastic compound exercise that targets your glutes, quadriceps, and hamstrings, with a significant emphasis on your inner thighs and hip abductors. It’s also excellent for improving hip mobility and strengthening the muscles responsible for lateral movement, crucial for everyday activities and sports performance.
How to Perform:
- Starting Position: Stand tall with your feet hip-width apart, arms at your sides or clasped in front of your chest for balance. Keep your core engaged and your gaze forward.
- The Lunge: Take a wide step out to your right side with your right foot. As your foot lands, hinge at your hips and push your glutes back, lowering your body into a lunge. Your right knee should track directly over your right ankle, and your left leg should remain straight, acting as an anchor. Ensure your chest stays lifted throughout the movement, preventing your back from rounding.
- Depth and Weight Distribution: Focus on sitting back into your right heel, feeling the stretch in your left inner thigh. Descend until your right thigh is parallel to the ground, or as deep as your flexibility allows while maintaining good form.
- Return to Start: Exhale as you push off your right foot, driving through your heel, to return to the standing starting position. Bring your right foot back to meet your left.
- Alternating Sides: Immediately switch sides, stepping out with your left leg and repeating the movement. Complete 20 repetitions in total, which means 10 lunges on each leg.
Modifications & Advancements:
- Modification: If you are new to lateral lunges, focus on achieving proper form without going too deep initially. You can also reduce the width of your step.
- Advancement: To intensify this exercise and further challenge your leg and glute strength, hold a light to medium-weight dumbbell in each hand, letting them hang at your sides. Alternatively, hold one dumbbell at chest level.
Tip: Maintain a neutral spine throughout the movement. Avoid letting your knee cave inward or extend too far past your ankle. Controlled, deliberate movements are key.
3. Narrow Push-Ups (10 Reps)
The Narrow Push-Up (often referred to as a Triceps Push-Up or Chaturanga Push-Up) is an excellent upper body exercise that primarily targets your triceps and the inner chest, with secondary engagement of your shoulders and core. It’s a fantastic way to build pressing strength and arm definition.
How to Perform:
- Starting Position: Begin in a high plank pose with your hands positioned directly beneath your shoulders, fingers pointing forward. Your body should form a straight line from head to heels, with your core engaged.
- Lowering Phase: On an inhale, bend your elbows and lower your chest towards the floor. Keep your elbows tucked close to your sides throughout the movement, almost brushing against your rib cage. Lead with your chest, maintaining a flat back and neck in line with your spine.
- Bottom Position: Descend until your chest nearly touches the floor, or as deep as you can go while maintaining control and proper form.
- Pushing Phase: On an exhale, powerfully press through your palms, extending your arms to push your body back up to the starting high plank position.
Modification:
- Knee Push-Up: If performing on your toes is too challenging, drop down to your knees. Ensure your body still forms a straight line from your head to your knees, maintaining core engagement, and follow the same form cues for your upper body.
Tip: Keep your core tight to prevent your hips from sagging or rising too high. Focus on controlled movement rather than speed.
4. Reverse Lunge to Balance Overhead Press (20 Reps Total, 10 per Leg)
This dynamic compound exercise is a true full-body challenge, combining lower body strength, core stability, and upper body power. It effectively targets your glutes, quads, hamstrings, shoulders, and significantly improves your balance and coordination.
How to Perform:
- Starting Position: Stand tall with your feet hip-width apart, holding a medium-size dumbbell in each hand. Rest the dumbbells on your shoulders, palms facing forward, elbows tucked slightly forward.
- Reverse Lunge: Step back with your right leg and lower into a reverse lunge. Both knees should form approximately 90-degree angles, with your front knee stacked directly over your ankle, and your chest lifted.
- Transition to Balance: From the lunge, push off your back foot (right leg), driving your right knee forward and up towards your chest. As you do this, shift your weight onto your left leg, balancing on one foot.
- Overhead Press: At the peak of your balance, while your right knee is lifted, powerfully press the dumbbells straight overhead until your arms are fully extended (but not locked).
- Controlled Return: Lower the dumbbells back to your shoulders, then with control, step your right foot back down to the starting position or directly into another reverse lunge for the next repetition.
- Repetitions: Complete 10 repetitions on one leg before switching to the other side for another 10 repetitions, ensuring an even workout.
Modification:
- Reduced Weight or Bodyweight: Use lighter dumbbells or perform the exercise without weights to focus on mastering the movement and balance.
Tip: Engage your core throughout the entire movement, especially during the balance and press phases, to maintain stability and protect your lower back. Control the descent of the dumbbells to avoid momentum.
5. Push-Ups on Physio Ball (10 Reps)
Performing push-ups with your hands on a physio ball introduces an element of instability, dramatically increasing the activation of your core muscles and stabilizers, in addition to working your chest, shoulders, and triceps. This variation builds functional strength and improves overall body control.
How to Perform:
- Starting Position: Begin in a high plank pose with your hands placed on the outside of a physio ball. The wider your hand placement on the ball, the more stable (and easier) the exercise will be; a narrower grip increases the challenge. Your body should form a straight line from head to heels, core tightly engaged.
- Lowering Phase: On an inhale, slowly lower your chest towards the physio ball, bending your elbows. Maintain a controlled movement, keeping your core stable and preventing the ball from rolling or wobbling excessively.
- Bottom Position: Descend until your chest is close to the ball, or as far as you can comfortably go while maintaining form.
- Pushing Phase: On an exhale, powerfully press through your hands, extending your arms to push your body back up to the starting high plank position. Actively engage your core to stabilize the ball throughout the movement.
Modification:
- Normal Push-Ups: If the physio ball variation is too challenging, perform standard push-ups on your knees or toes.
Tip: Focus on keeping your hips stable and your body in a straight line. The key benefit comes from resisting the instability of the ball, so controlled movements are more important than speed.
6. Butterfly Push-Ups (20 Reps)
The Butterfly Push-Up is a unique variation that places a greater emphasis on the outer chest and shoulders, providing a different stimulus compared to traditional or narrow push-ups. It’s excellent for developing a broader chest and improving shoulder stability.
How to Perform:
- Starting Position: Begin in a wide-arm high plank pose. Your hands should be positioned significantly wider than shoulder-width, approximately the width of a yoga mat, with your fingers pointing outwards and your wrists pointing slightly inwards. Your body should be in a straight line, core engaged.
- Lowering Phase: On an inhale, bend your elbows and lower your chest towards the floor. Lead with your chest, keeping your back flat and your neck in line with your spine. The wide hand position will naturally allow your elbows to flare out to the sides.
- Bottom Position: Descend until your chest nearly touches the floor, or as deep as your flexibility allows while maintaining control.
- Pushing Phase: On an exhale, powerfully press through your palms, extending your arms to push your body back up to the starting wide-arm plank position.
Modification:
- Knee Push-Ups: If performing on your toes is too difficult, drop down to your knees while maintaining the wide hand placement and proper upper body form.
Tip: Ensure your core remains tight throughout the movement to prevent your hips from sagging. The wide grip might feel different, so take it slow and controlled to ensure proper form and avoid shoulder strain.
7. Side Plank Hip Dips (30 Seconds per Side)
The Side Plank Hip Dip is a dynamic core exercise that specifically targets your oblique muscles and other lateral core stabilizers. It’s excellent for strengthening the muscles responsible for rotational stability, improving posture, and sculpting your waistline.
How to Perform:
- Starting Position: Begin in a forearm side plank on your left side. Your left elbow should be directly beneath your shoulder, and your body should form one long, straight line from your head to your heels. Stack your right foot on top of your left, and ensure your hips are lifted off the floor. Engage your core tightly.
- Lowering Phase: As you exhale, slowly and with control, lower your hips towards the floor. Do not fully rest them, just bring them close to the ground.
- Lifting Phase: Inhale and powerfully lift your hips back up to the starting side plank position, engaging your obliques.
- Repetitions: Continue this dipping and lifting motion for 30 seconds on your left side, then carefully switch to your right side and repeat for another 30 seconds.
Modification:
- Hold Side Plank: If the hip dips are too challenging, simply hold the static forearm side plank position for 30 seconds per side, focusing on maintaining a straight body line.
- Modified Side Plank: For a further modification, drop your bottom knee to the floor for added support while holding or dipping.
Tip: Keep your core engaged throughout the entire movement. Avoid letting your hips sag or rotate forward. Focus on controlled movements to maximize oblique activation.
The Cool-Down: Recovery & Flexibility
Just as important as your warm-up, a proper cool-down helps your body transition from an intense workout to a resting state. It aids in reducing muscle soreness, improving flexibility, and promoting relaxation. Dedicate 5-10 minutes to cooling down.
Perform static stretches, holding each stretch for 20-30 seconds. Focus on the major muscle groups you just worked:
- Hamstring stretch (seated or standing)
- Quadriceps stretch (standing or lying)
- Chest stretch (against a wall or doorway)
- Triceps stretch (overhead arm extension)
- Shoulder stretch
- Glute stretch (figure-four stretch)
- Gentle spinal twists
Breathe deeply during your stretches to help your muscles relax and lengthen.
Maximizing Your Results: Tips for Long-Term Success
This workout is a powerful tool, but consistent effort and a holistic approach are key to achieving and maintaining your desired fitness levels. Consider these tips to maximize your results:
- Consistency is Key: Aim to perform this full-body circuit 2-3 times per week, allowing a day of rest in between sessions for muscle recovery.
- Progressive Overload: As you get stronger, challenge yourself by gradually increasing your dumbbell weight, adding more repetitions, or completing more circuits (e.g., moving from 3 to 4 circuits).
- Nutrition Matters: Fuel your body with a balanced diet rich in lean proteins, complex carbohydrates, and healthy fats. Proper nutrition supports muscle repair, energy levels, and fat loss.
- Stay Hydrated: Drink plenty of water throughout the day, especially before, during, and after your workouts. Hydration is vital for performance and recovery.
- Prioritize Rest: Ensure you get adequate sleep (7-9 hours) to allow your body to recover and muscles to rebuild stronger.
- Listen to Your Body: Pay attention to any pain or discomfort. It’s okay to take extra rest days or modify exercises if needed. Pushing through sharp pain can lead to injury.
Conclusion: Embrace the Challenge, Transform Your Body
This comprehensive full-body workout isn’t just about burning calories or building muscle; it’s about building resilience, improving your overall health, and discovering the strength you possess. By consistently combining the power of cardio and strength training, you’ll unlock unparalleled fat loss, significant muscle toning, and a profound boost in your energy and confidence.
Embrace the challenge, commit to the process, and watch as your body transforms, leaving you feeling stronger, more vibrant, and truly empowered. Your journey to peak fitness starts now!
Disclaimer: Please consult your doctor before starting any new fitness regimen. While this workout program was developed with professional guidance, you are participating at your own risk. Please modify exercises as needed and always listen to your body to prevent injury.